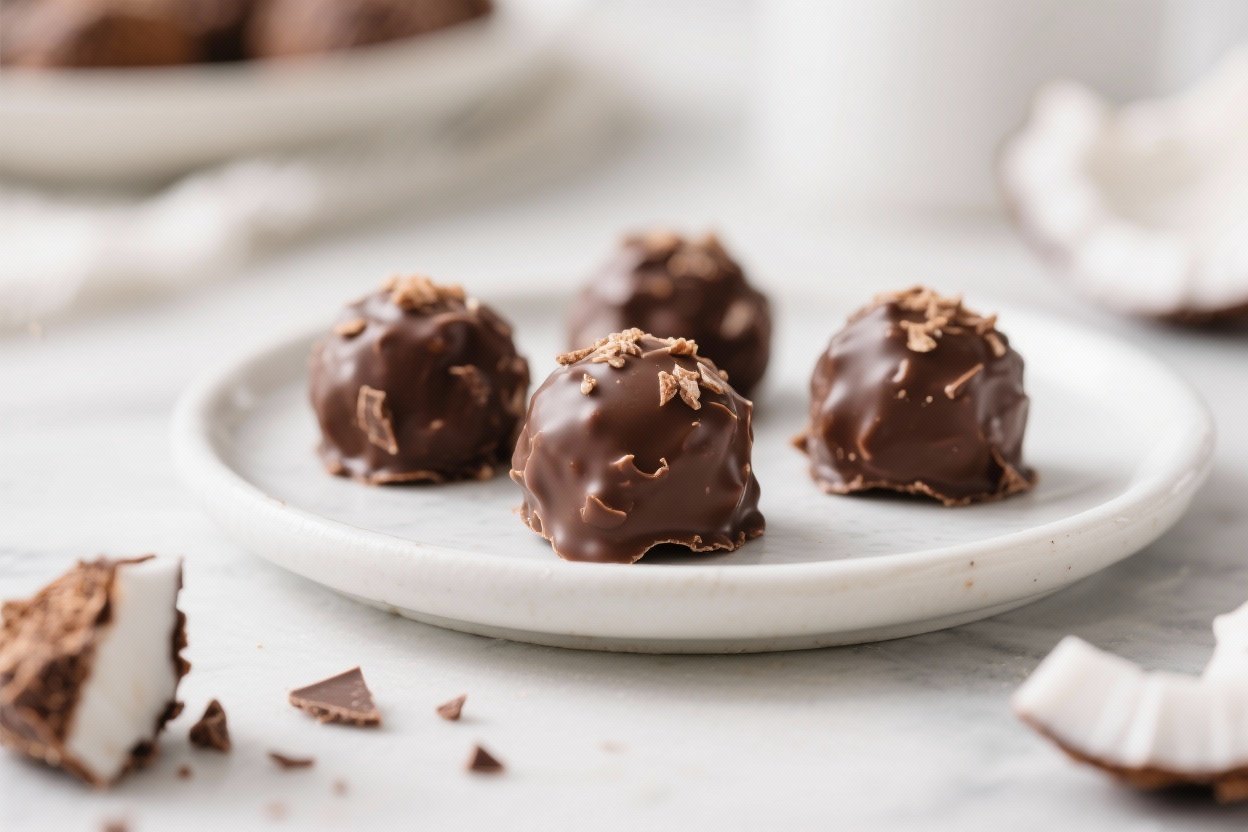
5-Ingredient No-Bake Chocolate Coconut Bites – Simple, Sweet, and Satisfying
If you love quick treats that taste like dessert but don’t require an oven, these chocolate coconut bites are for you. They’re rich, chewy, lightly sweet, and come together in about 10 minutes. No mixers, no fancy tools—just a bowl, a spoon, and a little chill time.
These bites are perfect for a snack, a lunchbox treat, or a small after-dinner sweet. Plus, with only five simple ingredients, you probably already have most of them on hand.
5-Ingredient No-Bake Chocolate Coconut Bites - Simple, Sweet, and Satisfying
Ingredients
Method
- Prep your bowl: Grab a medium mixing bowl and a sturdy spoon or spatula. Line a plate or baking sheet with parchment paper so the bites don’t stick.
- Combine dry ingredients: Add 1½ cups unsweetened shredded coconut and ¼ cup cocoa powder to the bowl. Stir to evenly coat the coconut with cocoa.
- Stir in wet ingredients: Add ½ cup nut or seed butter, ¼ cup maple syrup (or honey), and 1 teaspoon vanilla extract. If your nut butter is very thick, warm it for 10–15 seconds in the microwave to make mixing easier.
- Mix until sticky: Stir until the mixture looks uniform and holds together when pressed. If it’s too dry, add 1–2 teaspoons more maple syrup. If it’s too sticky, sprinkle in a tablespoon more shredded coconut.
- Adjust flavor: Taste and add a small pinch of salt if needed. Salt boosts chocolate flavor and balances sweetness.
- Shape the bites: Scoop about 1 tablespoon of mixture and roll it between your palms to form a ball. Place on the lined sheet. Repeat with the remaining mixture.
- Optional coating: For a pretty finish and less stickiness, roll the balls in extra shredded coconut or a light dusting of cocoa powder.
- Chill to set: Refrigerate for 20–30 minutes, or freeze for 10–15 minutes, until firm. They’ll hold together better once chilled.
- Serve: Enjoy straight from the fridge for the best texture—soft, fudgy, and not crumbly.
Overeating is a pattern. This helps you fix that problem. A quick reset for cravings, snacking, and “I’ll start tomorrow” moments.
Built for busy home cooks who want real-life structure. Simple steps that fit meal prep, family dinners, and late-night snack attacks.
What Makes This Recipe So Good

- Only five ingredients: Simple pantry staples, no complicated steps.
- No-bake and quick: Mix, roll, chill. That’s it.
- Perfect texture: Soft and fudgy with a pleasant coconut chew.
- Customizable sweetness: Use maple syrup or honey and adjust to taste.
- Great for sharing: Bite-sized, portable, and kid-friendly.
Shopping List
- Unsweetened shredded coconut
- Cocoa powder (preferably Dutch-process for smoother flavor)
- Nut butter (almond, peanut, or cashew) or seed butter for nut-free
- Maple syrup or honey
- Vanilla extract
Optional but recommended add-ins: A pinch of salt, mini chocolate chips, or coconut oil if you prefer a silkier texture.
Step-by-Step Instructions

- Prep your bowl: Grab a medium mixing bowl and a sturdy spoon or spatula.
Line a plate or baking sheet with parchment paper so the bites don’t stick.
- Combine dry ingredients: Add 1½ cups unsweetened shredded coconut and ¼ cup cocoa powder to the bowl. Stir to evenly coat the coconut with cocoa.
- Stir in wet ingredients: Add ½ cup nut or seed butter, ¼ cup maple syrup (or honey), and 1 teaspoon vanilla extract. If your nut butter is very thick, warm it for 10–15 seconds in the microwave to make mixing easier.
- Mix until sticky: Stir until the mixture looks uniform and holds together when pressed.
If it’s too dry, add 1–2 teaspoons more maple syrup. If it’s too sticky, sprinkle in a tablespoon more shredded coconut.
- Adjust flavor: Taste and add a small pinch of salt if needed. Salt boosts chocolate flavor and balances sweetness.
- Shape the bites: Scoop about 1 tablespoon of mixture and roll it between your palms to form a ball.
Place on the lined sheet. Repeat with the remaining mixture.
- Optional coating: For a pretty finish and less stickiness, roll the balls in extra shredded coconut or a light dusting of cocoa powder.
- Chill to set: Refrigerate for 20–30 minutes, or freeze for 10–15 minutes, until firm. They’ll hold together better once chilled.
- Serve: Enjoy straight from the fridge for the best texture—soft, fudgy, and not crumbly.
How to Store
- Refrigerator: Store in an airtight container for up to 1 week.
Layer with parchment if stacking.
- Freezer: Freeze for up to 2 months. Thaw at room temperature for 10–15 minutes, or enjoy slightly frozen for a firmer bite.
- On-the-go: Pack with an ice pack if taking them out on a warm day. They can get soft at room temperature after a few hours, especially if your nut butter is runny.

Why This is Good for You
- Healthy fats and fiber: Coconut and nut butter offer satisfying fats and fiber to keep you full longer.
- No refined sugar needed: Maple syrup or honey adds gentle sweetness without the heavy sugar crash.
- Cocoa perks: Cocoa contains antioxidants and adds deep chocolate flavor without extra sugar.
- Gluten-free and customizable: Naturally gluten-free and easy to make dairy-free or nut-free with simple swaps.
Common Mistakes to Avoid
- Using sweetened coconut: It can make the bites overly sweet and sticky.
Stick with unsweetened shredded coconut.
- Not measuring cocoa: Too much cocoa can make the mixture bitter and dry. Measure and adjust gradually.
- Skipping the chill: The mixture firms up in the fridge. If you skip this step, the bites may crumble or feel gooey.
- Using very dry nut butter: Dry or old nut butter can make the mixture crumbly.
Warm it slightly or add a teaspoon of coconut oil or maple syrup to loosen.
- Overmixing add-ins: If you add chocolate chips, stir them in gently so they don’t melt and streak the mixture.
Variations You Can Try
- Nut-free: Swap nut butter for sunflower seed butter or tahini. Add a touch more maple syrup if tahini tastes too bitter.
- Mocha: Add 1 teaspoon instant espresso powder to the cocoa for a coffee kick.
- Almond joy vibes: Mix in chopped almonds and finish with a drizzle of melted dark chocolate.
- Protein boost: Replace 2 tablespoons of the shredded coconut with chocolate or vanilla protein powder. Add an extra teaspoon of syrup if needed to bind.
- Orange-chocolate: Add ½ teaspoon orange zest and a tiny splash of orange extract for a bright twist.
- Peppermint: Add ⅛ teaspoon peppermint extract for a mint-chocolate treat, especially nice around the holidays.
- Extra fudgy: Stir in 1 tablespoon melted coconut oil for a silkier, truffle-like texture.
FAQ
Can I use sweetened shredded coconut?
You can, but the bites will be much sweeter and may feel sticky.
If that’s your only option, reduce the maple syrup by 1–2 tablespoons and add more coconut if the mix is too wet.
Which cocoa powder works best?
Dutch-process cocoa gives a smoother, less acidic chocolate flavor, but natural cocoa works too. If using natural cocoa, consider a pinch more sweetener or vanilla to balance the flavor.
My mixture is crumbly. How do I fix it?
Add a teaspoon of maple syrup or a drizzle of melted coconut oil and mix again.
Keep adding a little at a time until it holds together when pressed.
Can I make these vegan?
Yes. Use maple syrup instead of honey and check your chocolate chips (if adding) for a vegan label.
How big should I roll them?
A heaping tablespoon per bite is a good size. You’ll get about 16–20 bites, depending on how generous you are with each scoop.
Do they taste like coconut?
Yes, but not overwhelmingly so.
The cocoa and vanilla mellow the coconut flavor, and the nut butter adds richness that balances everything out.
Can I press the mixture into a pan instead of rolling?
Absolutely. Press into a parchment-lined loaf pan, chill, and slice into squares. This is faster if you’re short on time.
Are these safe for lunchboxes?
Yes, though they soften if kept warm for long periods.
If your school is nut-free, use sunflower seed butter. Pack with a small ice pack for the best texture.
Wrapping Up
These 5-Ingredient No-Bake Chocolate Coconut Bites are the kind of treat you can whip up anytime and feel good about. They’re quick, satisfying, and endlessly adaptable to your taste.
Keep a batch in the fridge for a sweet pick-me-up, and switch up the flavors when you want something new. Simple ingredients, minimal effort, and big payoff—just the way a snack should be.
Printable Recipe Card
Want just the essential recipe details without scrolling through the article? Get our printable recipe card with just the ingredients and instructions.