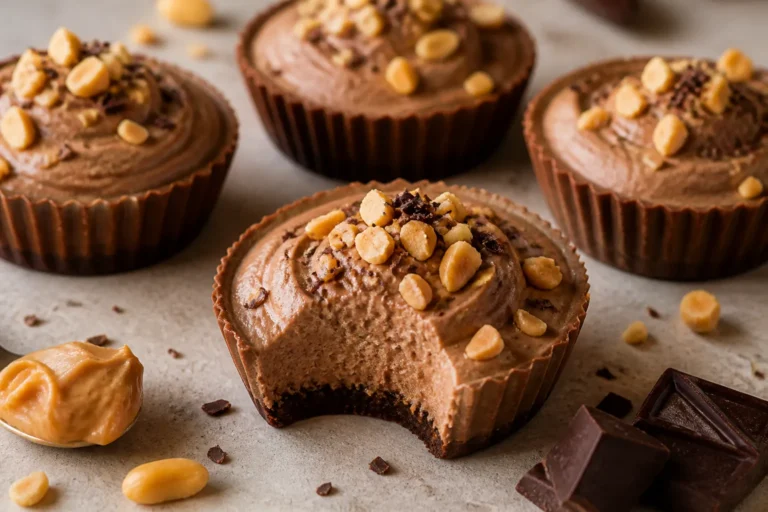
Low Carb No-Bake Chocolate Cheesecake Cups – Creamy, Easy, and Satisfying
These cheesecake cups hit that sweet spot between indulgent and smart. You get rich chocolate flavor, a silky texture, and a touch of crunch—all without turning on the oven. They’re perfect for busy weeknights, potlucks, or when you just want something special without a lot of fuss.
Need More Easy Dinner Ideas?
Get my FREE 7-Day Easy Dinner Reset and enjoy a full week of healthy dinners without the meal-planning stress.
The best part? They’re low in carbs but big on satisfaction, so you can enjoy dessert and still feel good about it.

Ingredients
Method
- Prep your tools. Line a 12-cup muffin tin with silicone or paper liners. This makes unmolding clean and simple.
- Make the crust base. In a bowl, mix almond flour, optional coconut or pecans, 1 tablespoon cocoa powder, 2 tablespoons powdered sweetener, and a pinch of salt. Stir in the melted butter until the mixture looks like damp sand and holds together when pressed.
- Portion and press. Divide the crust mixture among the liners (about 1 heaping tablespoon each). Press firmly with the back of a spoon or the bottom of a shot glass to create an even layer. Chill while you make the filling.
- Soften the cream cheese. Make sure it’s truly soft to avoid lumps. If needed, microwave for 10–15 seconds, just until pliable.
- Whip the cream. In a cold bowl, beat heavy cream to soft peaks. Don’t overbeat. Set aside.
- Blend the filling base. In a separate bowl, beat cream cheese, powdered sweetener (start with 1/2 cup), cocoa powder, vanilla, and a pinch of salt until smooth and fluffy, 1–2 minutes. Taste and adjust sweetness, keeping in mind the chocolate you’ll add next.
- Add melted chocolate. Stir in the melted, slightly cooled dark chocolate until fully combined. The mixture should be thick and glossy.
- Fold in the whipped cream. Gently fold the whipped cream into the chocolate mixture in two additions. This keeps the filling airy and silky.
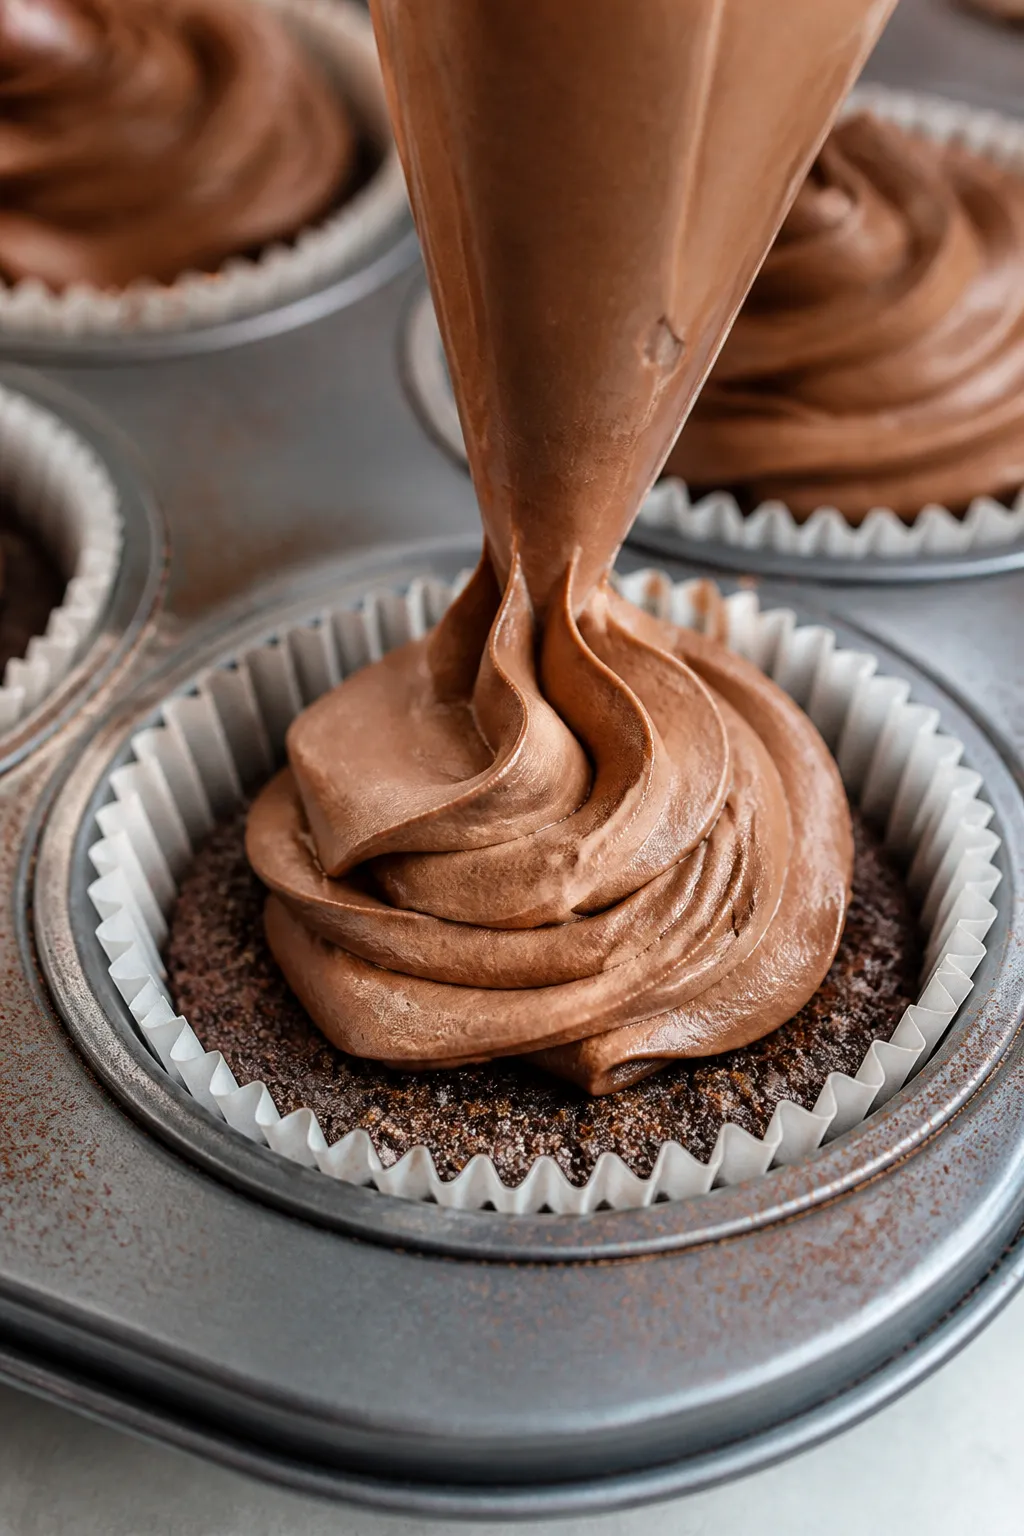
- Fill the cups. Spoon or pipe the filling over the chilled crusts, dividing evenly among the cups. Smooth the tops with the back of a spoon.
- Chill to set. Refrigerate for at least 2 hours, or until firm enough to unmold and hold shape. Overnight is even better.
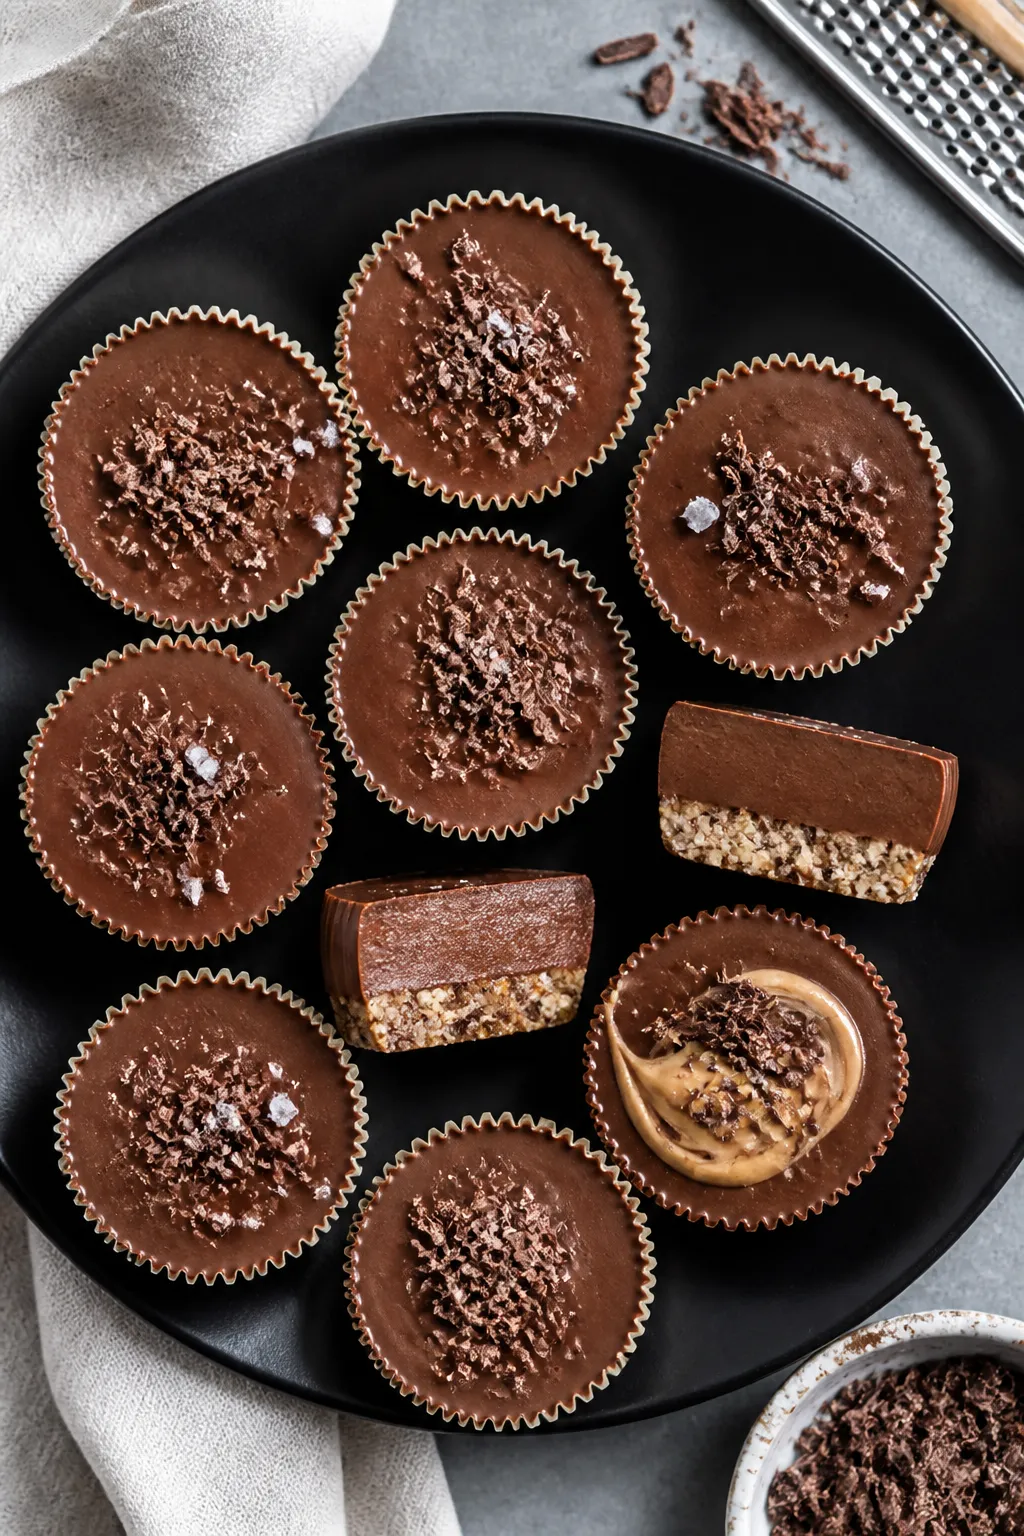
- Finish and serve. Garnish with a sprinkle of flaky sea salt, shaved chocolate, or a dusting of cocoa. Serve chilled.
Why This Recipe Works
This is a no-bake recipe, so you skip the stress of oven timing and water baths. The filling sets beautifully in the fridge thanks to cream cheese and a bit of heavy cream, giving you that classic cheesecake creaminess without baking.
Using a powdered, zero-calorie sweetener keeps the texture smooth and the carbs low. A simple nut-and-cocoa “crust” adds crunch and flavor without the flour. The result is a dessert that tastes decadent but fits a low-carb lifestyle.
What You’ll Need
- Cream Cheese: 16 oz (full-fat, softened at room temperature)
- Unsweetened Cocoa Powder: 1/4 cup for the filling
- Dark Chocolate (sugar-free or 85–90% cacao): 3 oz, melted and slightly cooled
- Heavy Whipping Cream: 1/2 cup
- Powdered Low-Carb Sweetener: 1/2 to 3/4 cup (allulose, powdered erythritol, or a blend)
- Vanilla Extract: 1 teaspoon
- Pinch of Fine Sea Salt: to balance sweetness
- Almond Flour: 3/4 cup for the crust
- Unsweetened Shredded Coconut or Chopped Pecans: 1/4 cup (optional, for texture in crust)
- Butter: 3 tablespoons, melted (for the crust)
- Cocoa Powder (extra): 1 tablespoon for the crust
- Powdered Low-Carb Sweetener (extra): 2 tablespoons for the crust
- Flaky Sea Salt or Shaved Chocolate: optional garnish
- Silicone or Paper Liners and a Muffin Tin: for easy portioning
How to Make It
- Prep your tools. Line a 12-cup muffin tin with silicone or paper liners.
This makes unmolding clean and simple.
- Make the crust base. In a bowl, mix almond flour, optional coconut or pecans, 1 tablespoon cocoa powder, 2 tablespoons powdered sweetener, and a pinch of salt. Stir in the melted butter until the mixture looks like damp sand and holds together when pressed.
- Portion and press. Divide the crust mixture among the liners (about 1 heaping tablespoon each). Press firmly with the back of a spoon or the bottom of a shot glass to create an even layer.
Chill while you make the filling.
- Soften the cream cheese. Make sure it’s truly soft to avoid lumps. If needed, microwave for 10–15 seconds, just until pliable.
- Whip the cream. In a cold bowl, beat heavy cream to soft peaks. Don’t overbeat.
Set aside.
- Blend the filling base. In a separate bowl, beat cream cheese, powdered sweetener (start with 1/2 cup), cocoa powder, vanilla, and a pinch of salt until smooth and fluffy, 1–2 minutes. Taste and adjust sweetness, keeping in mind the chocolate you’ll add next.
- Add melted chocolate. Stir in the melted, slightly cooled dark chocolate until fully combined. The mixture should be thick and glossy.
- Fold in the whipped cream. Gently fold the whipped cream into the chocolate mixture in two additions.
This keeps the filling airy and silky.
- Fill the cups. Spoon or pipe the filling over the chilled crusts, dividing evenly among the cups. Smooth the tops with the back of a spoon.
- Chill to set. Refrigerate for at least 2 hours, or until firm enough to unmold and hold shape. Overnight is even better.
- Finish and serve. Garnish with a sprinkle of flaky sea salt, shaved chocolate, or a dusting of cocoa.
Serve chilled.
How to Store
Keep the cups covered in the fridge for up to 5 days. For longer storage, freeze them on a baking sheet until solid, then transfer to an airtight container. They’ll keep for up to 2 months frozen.
Thaw in the fridge for several hours or at room temperature for 20–30 minutes before serving. Avoid leaving them out in warm kitchens, as the texture softens quickly.
Why This is Good for You
- Lower in carbs: Using almond flour and a zero- or low-calorie sweetener keeps net carbs in check compared to traditional cheesecake.
- Healthy fats: Full-fat dairy and nuts help with satiety and steady energy, which can support low-carb or keto goals.
- Dark chocolate benefits: Dark chocolate and cocoa provide antioxidants and rich flavor without loads of sugar.
- No baking stress: Skipping the oven means fewer chances for cracks, overbaking, or dry texture.
Pitfalls to Watch Out For
- Grainy texture: Use a powdered sweetener, not granulated, to avoid a sandy finish. If you only have granulated, blitz it in a blender first.
- Lumpy filling: Start with fully softened cream cheese and beat it until smooth before adding chocolate.
Cold cream cheese causes clumps.
- Chocolate seize: Let the melted chocolate cool slightly before mixing. If it’s too hot, it can stiffen the filling or create streaks.
- Crust crumble: Press the crust firmly and use enough butter. If it’s too dry, add another teaspoon of melted butter.
- Too sweet or not sweet enough: Sweetness varies with different brands of sweetener. Taste as you go and adjust before chilling.
Alternatives
- Nut-free crust: Swap almond flour for sunflower seed flour or finely ground, unsweetened toasted coconut.
Add a bit more butter to help it bind.
- Dairy-free option: Use a dairy-free cream cheese and coconut cream (whipped) in place of heavy cream. Choose a dairy-free, sugar-free chocolate.
- Mocha twist: Add 1–2 teaspoons of instant espresso to the filling for a coffee-chocolate flavor.
- Peanut butter ribbon: Swirl in 2–3 tablespoons of natural peanut butter or almond butter before chilling.
- Mini bites: Use a mini muffin tin for bite-size treats. Reduce chill time slightly.
- Sweetener swaps: Allulose is very smooth and less cooling than erythritol.
Monk fruit blends are also great. Adjust amounts to taste.
FAQ
Can I make these without the crust?
Never Wonder What's For Dinner Again
Save time, eat healthier, and take the stress out of dinner. Get a full week of easy healthy dinners delivered straight to your inbox.
Yes. Spoon the filling directly into small ramekins or cups and chill.
You’ll get a mousse-like dessert that’s just as rich and even lower in carbs.
How many carbs are in each cup?
Exact carbs depend on your ingredients and sweetener. As a rough guide, using almond flour, allulose, and 90% chocolate, each cup typically lands around 4–6 net carbs. Check your labels for precise numbers.
Can I use cocoa powder only and skip the melted chocolate?
You can, but the melted chocolate adds body and a deeper flavor.
If you skip it, increase cocoa powder by 1–2 tablespoons and add a tablespoon of melted butter to maintain richness.
What if I don’t have a mixer?
A sturdy whisk will work. Beat the cream cheese until smooth first, then whisk in the other ingredients. Whip the cream in a cold bowl with a whisk until soft peaks form.
It’s an arm workout, but the texture will still be great.
Why is my filling too loose?
It might be from overmixing after adding the whipped cream or using room-temperature chocolate that was still too warm. Chill the mixture for 15–20 minutes to firm up, then spoon into cups and refrigerate until set.
Can I make this ahead?
Absolutely. These are perfect make-ahead desserts.
Prepare up to 24 hours in advance and keep covered in the fridge until serving time.
What garnish works best?
Try shaved dark chocolate, a dusting of cocoa powder, a few raspberries, or a tiny pinch of flaky sea salt. Keep it simple to let the chocolate cheesecake flavor shine.
Is there a way to add protein?
Yes. Whisk in 1–2 tablespoons of unflavored or chocolate whey isolate to the cream cheese mixture before folding in the whipped cream.
If it thickens too much, loosen with a splash of cream.
In Conclusion
Low Carb No-Bake Chocolate Cheesecake Cups give you a lush, chocolatey dessert with minimal effort and no oven time. The texture is creamy, the flavor is bold, and the ingredients are simple. Whether you’re hosting friends or treating yourself on a Tuesday night, these cups deliver a reliable, low-carb dessert you’ll want to make again and again.
Keep a batch in the fridge, and you’ll always have something sweet and satisfying ready to go.
Printable Recipe Card
Want just the essential recipe details without scrolling through the article? Get our printable recipe card with just the ingredients and instructions.
Loved This Recipe?
If you're looking for more simple, healthy dinners your family will actually eat, grab my FREE 7-Day Easy Dinner Reset. You'll get 7 easy dinner recipes, simple grocery lists, and a done-for-you plan that takes the stress out of mealtime.