Keto Chocolate Peanut Butter Lava Cakes – Rich, Gooey, and Low-Carb
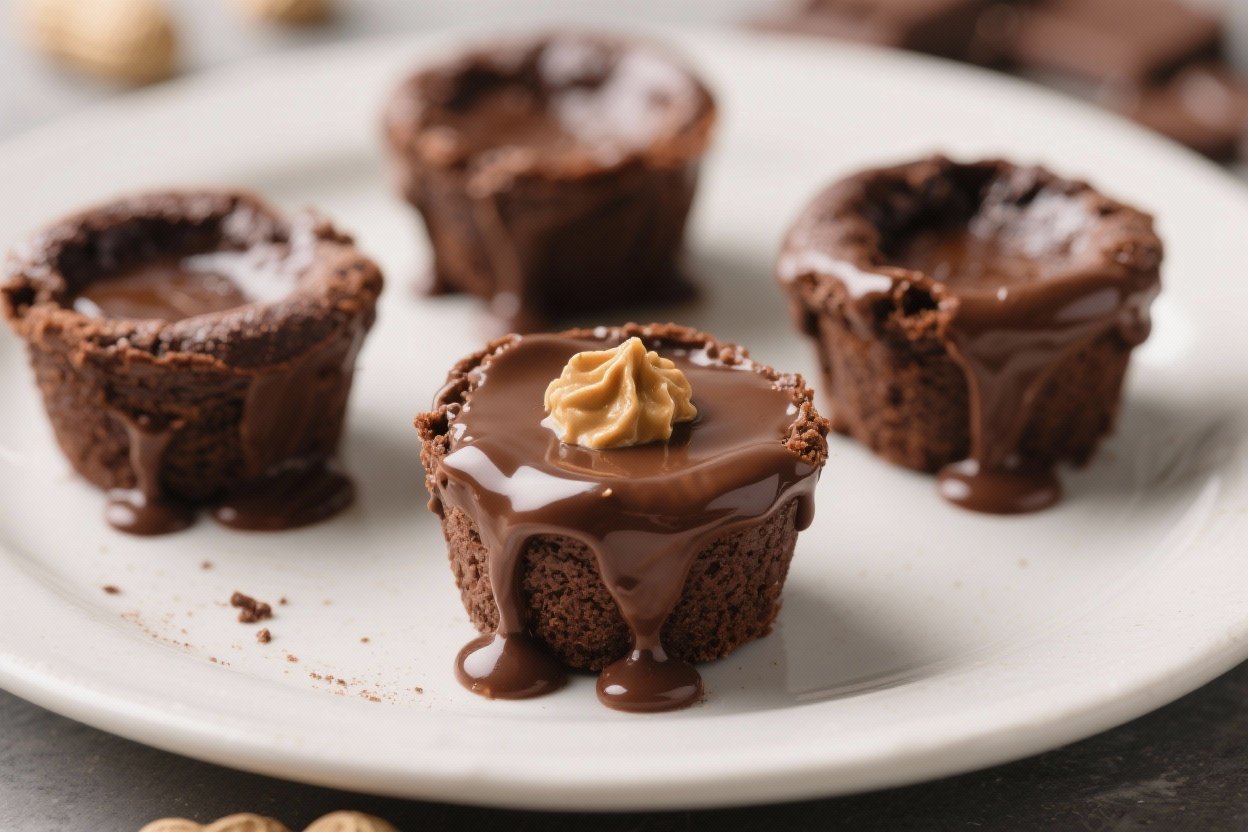
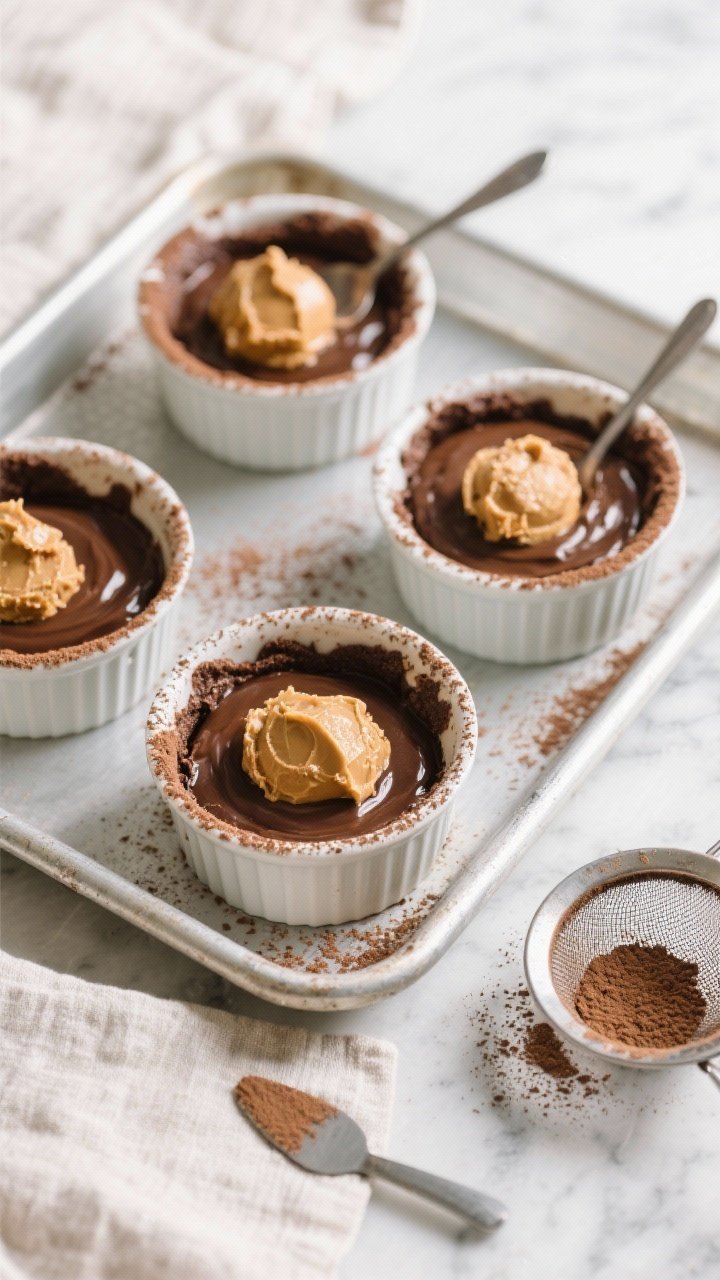
Imagine a warm, fudgy cake with a molten peanut butter center that oozes out with every spoonful. That’s what you get with these Keto Chocolate Peanut Butter Lava Cakes—pure comfort with a smart, low-carb twist. They taste decadent, but they’re easy enough for a weeknight dessert.
Need More Easy Dinner Ideas?
Get my FREE 7-Day Easy Dinner Reset and enjoy a full week of healthy dinners without the meal-planning stress.
No special equipment beyond ramekins and a mixing bowl. Best of all, you can make them ahead and bake to order when the craving hits.
Ingredients
Method
- Prep the ramekins: Preheat the oven to 400°F (200°C). Grease four 6-ounce ramekins well with butter or coconut oil. Lightly dust with cocoa powder to help the cakes release cleanly.
- Melt the chocolate and butter: In a heat-safe bowl, combine 3 ounces sugar-free chocolate and 6 tablespoons butter. Microwave in 20–30 second bursts, stirring between each, until smooth. Set aside to cool slightly.
- Mix dry ingredients: In a separate bowl, whisk 1/3 cup almond flour, 1/4 cup unsweetened cocoa powder, 1/3 cup granular keto sweetener, 1/2 teaspoon baking powder, a pinch of salt, and 1/4 teaspoon espresso powder (optional).
- Whisk the eggs: In another bowl, whisk 2 large eggs with 1 teaspoon vanilla until slightly frothy. This helps the cakes puff.
- Combine wet and dry: Pour the melted chocolate mixture into the eggs, whisking steadily. Add the dry ingredients and stir until smooth and glossy. The batter will be thick but pourable.
- Make the peanut butter centers: Scoop 4 rounded teaspoons of natural peanut butter onto a parchment-lined plate. Freeze for 5–10 minutes to firm up. This helps keep the center molten without leaking.
- Assemble: Spoon about 2 tablespoons of batter into each ramekin. Place a frozen peanut butter scoop in the center of each. Cover with remaining batter, dividing evenly. The peanut butter should be fully enclosed.
- Bake: Place the ramekins on a baking sheet and bake for 9–11 minutes. The edges should look set and puffed, while the centers remain slightly soft and jiggly. Do not overbake or you’ll lose the lava effect.
- Rest and release: Let the cakes sit for 1–2 minutes. Run a thin knife around the edge, invert onto a plate, and gently lift off the ramekin. Dust with powdered keto sweetener or cocoa if you like.
- Serve immediately: Enjoy warm with a small spoon. Optional toppings: a dollop of unsweetened whipped cream, a few raspberries, or a drizzle of melted sugar-free chocolate.
What Makes This Recipe So Good
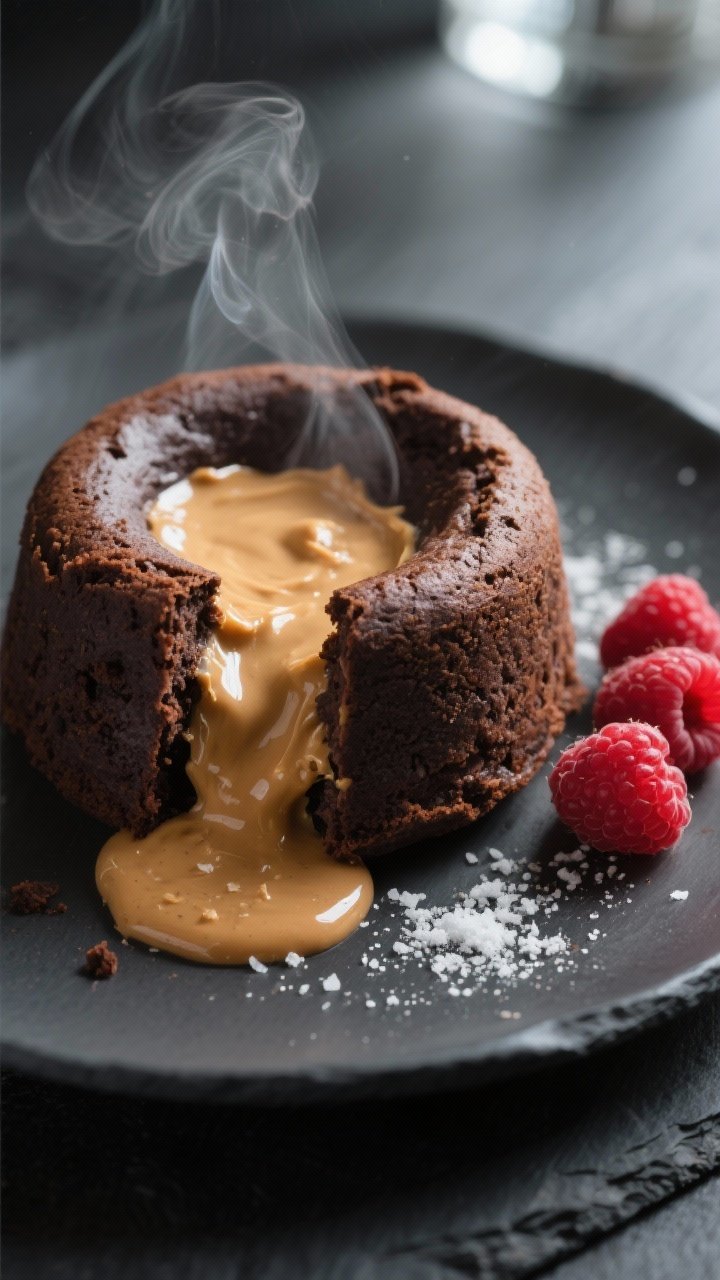
- Ultra rich and gooey: You get a soft, tender chocolate cake on the outside and a warm peanut butter center that melts like lava.
- Truly keto-friendly: Made with almond flour, unsweetened cocoa, and a zero-calorie sweetener for a low net carb count.
- Fast and simple: From mixing bowl to table in about 20 minutes.
- Built-in portion control: Baked in individual ramekins, so each serving is ready to go.
- Customizable sweetness: Adjust the sweetener to taste without affecting the texture.
What You’ll Need
- Unsweetened cocoa powder: Dutch-processed or natural both work; Dutch gives a smoother chocolate flavor.
- Almond flour: Finely ground, blanched almond flour creates a tender crumb.
- Granular keto sweetener: Erythritol, allulose, or a blend. Allulose gives the softest texture; erythritol is more crisp.
- Eggs: Room temperature for better mixing and rise.
- Butter: Melted and slightly cooled; adds richness and moisture.
- Sugar-free chocolate: Chopped or chips, at least 60% cocoa for depth.
- Peanut butter: Natural, no-sugar-added and thick.
Stir well so it isn’t oily.
- Vanilla extract: For warmth and balance.
- Baking powder: A small amount for lift.
- Salt: Enhances chocolate flavor and balances sweetness.
- Optional: A pinch of espresso powder to boost chocolate notes, and powdered keto sweetener for dusting.
- For greasing: Softened butter or coconut oil for the ramekins.
Step-by-Step Instructions
- Prep the ramekins: Preheat the oven to 400°F (200°C). Grease four 6-ounce ramekins well with butter or coconut oil. Lightly dust with cocoa powder to help the cakes release cleanly.
- Melt the chocolate and butter: In a heat-safe bowl, combine 3 ounces sugar-free chocolate and 6 tablespoons butter.
Microwave in 20–30 second bursts, stirring between each, until smooth. Set aside to cool slightly.
- Mix dry ingredients: In a separate bowl, whisk 1/3 cup almond flour, 1/4 cup unsweetened cocoa powder, 1/3 cup granular keto sweetener, 1/2 teaspoon baking powder, a pinch of salt, and 1/4 teaspoon espresso powder (optional).
- Whisk the eggs: In another bowl, whisk 2 large eggs with 1 teaspoon vanilla until slightly frothy. This helps the cakes puff.
- Combine wet and dry: Pour the melted chocolate mixture into the eggs, whisking steadily.
Add the dry ingredients and stir until smooth and glossy. The batter will be thick but pourable.
- Make the peanut butter centers: Scoop 4 rounded teaspoons of natural peanut butter onto a parchment-lined plate. Freeze for 5–10 minutes to firm up.
This helps keep the center molten without leaking.
- Assemble: Spoon about 2 tablespoons of batter into each ramekin. Place a frozen peanut butter scoop in the center of each. Cover with remaining batter, dividing evenly.
The peanut butter should be fully enclosed.
- Bake: Place the ramekins on a baking sheet and bake for 9–11 minutes. The edges should look set and puffed, while the centers remain slightly soft and jiggly. Do not overbake or you’ll lose the lava effect.
- Rest and release: Let the cakes sit for 1–2 minutes. Run a thin knife around the edge, invert onto a plate, and gently lift off the ramekin.
Dust with powdered keto sweetener or cocoa if you like.
- Serve immediately: Enjoy warm with a small spoon. Optional toppings: a dollop of unsweetened whipped cream, a few raspberries, or a drizzle of melted sugar-free chocolate.
How to Store
- Unbaked: Assemble the filled ramekins, cover tightly, and refrigerate up to 24 hours. Bake straight from the fridge, adding 1–2 extra minutes as needed.
- Baked: These are best fresh.
If you have leftovers, refrigerate covered for up to 2 days. Reheat in the microwave for 15–25 seconds to warm the center, though it may be less molten.
- Freezer-friendly: Freeze assembled, unbaked cakes (wrapped well) for up to 2 months. Bake from frozen at 400°F (200°C) for 12–14 minutes, checking for that soft center.
Benefits of This Recipe
- Low-carb indulgence: Satisfies dessert cravings without a sugar crash.
- High in healthy fats: Almond flour, peanut butter, and butter help keep you fuller longer.
- Gluten-free by default: No wheat flour needed, and the texture is still tender.
- Portion-controlled: Individual servings make macros easier to track.
- Quick cleanup: A few bowls and ramekins, and you’re done.
What Not to Do
- Don’t use sweetened peanut butter: It adds sugar and can throw off your macros and the texture.
- Don’t overbake: Past the 11–12 minute mark, the center will set and you’ll lose the lava flow.
- Don’t skip greasing and dusting the ramekins: This step helps the cakes release cleanly without tearing.
- Don’t use coarse almond meal: It can make the cakes gritty.
Choose finely ground, blanched almond flour.
- Don’t add cold eggs to hot chocolate: You’ll risk scrambling. Let the melted chocolate cool slightly first.
Recipe Variations
- Almond butter lava cakes: Swap peanut butter for unsweetened almond butter for a peanut-free option.
- Double chocolate: Replace the peanut butter centers with small truffles made from sugar-free chocolate ganache.
- Hazelnut twist: Use sugar-free hazelnut spread (keto-friendly) for a nutty, Nutella-like center.
- Dairy-free: Use coconut oil in place of butter and a dairy-free, sugar-free chocolate bar. Flavor will be slightly different but still rich.
- Spiced mocha: Add 1/2 teaspoon cinnamon and 1/4 teaspoon espresso powder to the batter for a warm, café-style vibe.
- Salted peanut butter: Sprinkle a pinch of flaky sea salt on the lava after unmolding for a sweet-salty finish.
FAQ
Can I make these without ramekins?
Never Wonder What's For Dinner Again
Save time, eat healthier, and take the stress out of dinner. Get a full week of easy healthy dinners delivered straight to your inbox.
You can use a well-greased muffin tin, but reduce the bake time to 7–9 minutes because the smaller size cooks faster.
Keep a close eye on the centers.
Which sweetener works best?
Allulose gives the softest texture and least aftertaste. Erythritol blends can work but may crystallize slightly as they cool. You can also use a monk fruit/allulose blend.
How do I know when they’re done?
Look for set edges and a slightly jiggly center.
If a toothpick inserted near the edge comes out with a few moist crumbs, you’re good. If it’s completely dry, you likely overbaked.
Can I make them nut-free?
Use sunflower seed butter for the center and replace almond flour with a finely ground seed flour blend. Note that sunflower seed butter may tint green when baked due to chlorophyll reacting with baking soda or powder—harmless but noticeable.
What’s the carb count?
It varies by brands, but each cake typically lands around 5–7g net carbs when using almond flour, allulose, and unsweetened peanut butter.
Always calculate with your specific ingredients.
Do I have to freeze the peanut butter?
It’s not mandatory, but it helps keep the center distinct and molten. Without freezing, the peanut butter may spread slightly into the batter.
Can I prep the batter ahead?
Yes. Assemble the cakes in ramekins and refrigerate up to a day.
Bake just before serving, adding a minute or two as needed.
Why did my cakes stick?
They likely needed more greasing or a light cocoa dusting. Also, make sure to rest for a minute and run a thin knife around the edge before unmolding.
Wrapping Up
These Keto Chocolate Peanut Butter Lava Cakes deliver the comfort of a classic restaurant dessert with smart, low-carb ingredients. They’re simple, fast, and endlessly customizable.
Keep a few assembled in the fridge or freezer, and you’re never more than a few minutes away from a warm, gooey treat. Serve them to guests or make a quiet weeknight feel special—either way, they’ll disappear fast.
Printable Recipe Card
Want just the essential recipe details without scrolling through the article? Get our printable recipe card with just the ingredients and instructions.
Loved This Recipe?
If you're looking for more simple, healthy dinners your family will actually eat, grab my FREE 7-Day Easy Dinner Reset. You'll get 7 easy dinner recipes, simple grocery lists, and a done-for-you plan that takes the stress out of mealtime.