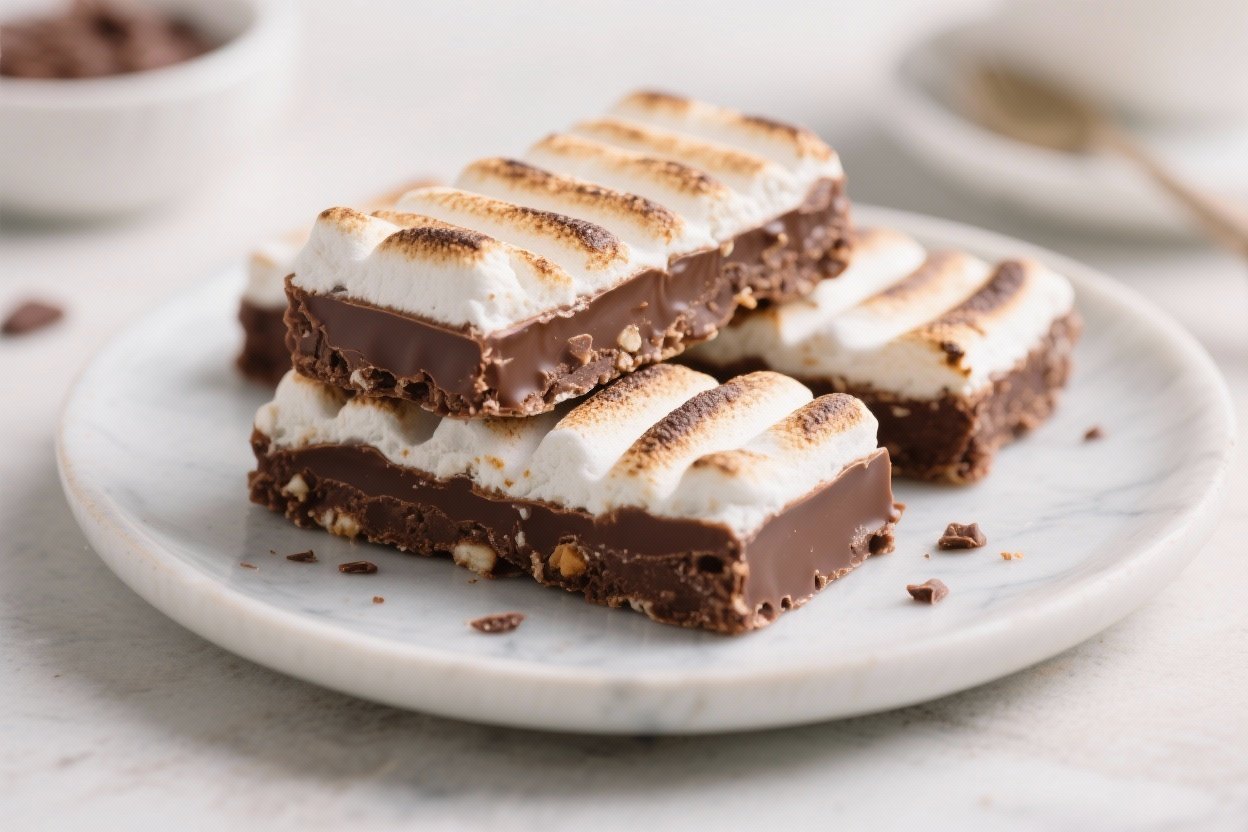
Keto Chocolate Marshmallow Bars – A Chewy, Fudgy, Low-Carb Treat
If you miss classic chocolate-marshmallow bars but want to stay low-carb, these Keto Chocolate Marshmallow Bars bring the nostalgia without the sugar crash. They’re gooey, chocolatey, and satisfy that sweet tooth with smart swaps. You’ll get a crisp almond-coconut crust, a fluffy “marshmallow” layer made keto-friendly, and a glossy chocolate top.
They’re easy enough for a weeknight project, yet pretty enough for a party tray. Make a pan, slice them small, and enjoy a treat that actually fits your goals.
Overeating is a pattern. This helps you fix that problem. A quick reset for cravings, snacking, and “I’ll start tomorrow” moments.
Built for busy home cooks who want real-life structure. Simple steps that fit meal prep, family dinners, and late-night snack attacks.
What Makes This Special
- Truly low-carb: Uses almond flour, coconut, and sugar-free sweeteners to keep net carbs in check.
- Real marshmallow texture: A homemade gelatin-based layer gives that familiar bounce without sugar.
- Layers of flavor: Toasty nutty crust, vanilla marshmallow, and rich dark chocolate.
- No weird aftertaste: A blend of erythritol/monk fruit or allulose keeps sweetness clean and smooth.
- Customizable: Add nuts, espresso, or peppermint for seasonal twists.
Shopping List
- For the crust:
- Almond flour (fine blanched)
- Unsweetened shredded coconut
- Unsalted butter (or coconut oil)
- Granular erythritol/monk fruit blend or allulose
- Vanilla extract
- Pinch of salt
- For the marshmallow layer:
- Unflavored powdered gelatin
- Allulose or a powdered erythritol/monk fruit blend (allulose gives a softer chew)
- Water
- Vanilla extract
- Pinch of salt
- For the chocolate topping:
- Sugar-free dark chocolate chips or bars (70–85% style, sweetened with erythritol/stevia or allulose)
- Coconut oil or cocoa butter (for a smoother, shiny finish)
- Flaky sea salt (optional)
- Optional mix-ins: Chopped pecans or almonds, sugar-free mini chocolate chips, unsweetened toasted coconut.
Step-by-Step Instructions
- Prep your pan: Line an 8×8-inch square pan with parchment, leaving overhang for easy lifting. Lightly grease the sides.
- Heat the oven: Preheat to 350°F (175°C).
- Make the crust: In a bowl, mix 1 1/2 cups almond flour, 1/2 cup unsweetened shredded coconut, 1/4 cup granular sweetener, and a pinch of salt.
Stir in 6 tablespoons melted butter and 1 teaspoon vanilla until the mixture resembles damp sand.
- Press and bake: Firmly press the crust into the lined pan in an even layer. Bake 10–12 minutes, until lightly golden at the edges. Cool completely on a rack.
- Bloom the gelatin: In the bowl of a stand mixer (or a large mixing bowl), sprinkle 2 1/2 teaspoons unflavored gelatin over 1/3 cup cool water.
Let sit 5 minutes to bloom.
- Make a hot syrup: In a small saucepan, combine 1/2 cup allulose (or 1/3 cup powdered erythritol blend), 1/4 cup water, a pinch of salt, and 1 teaspoon vanilla. Bring to a simmer over medium heat, stirring to dissolve. Simmer 2–3 minutes until slightly thickened.
Remove from heat.
- Whip the marshmallow: Start the mixer on low to break up the gelatin. Slowly stream in the hot syrup. Increase speed to high and whip 6–8 minutes until tripled in volume, white, and fluffy.
The mixture should form soft peaks and feel slightly warm, not hot.
- Spread the marshmallow layer: Immediately scrape the marshmallow onto the cooled crust. Smooth the top with a greased spatula. Let set at room temperature 30–45 minutes, or until lightly springy to the touch.
- Melt the chocolate: In a heatproof bowl, combine 1 cup sugar-free chocolate chips with 1 tablespoon coconut oil.
Melt gently over a double boiler or in 20–30 second microwave bursts, stirring until smooth and glossy.
- Top the bars: Pour the melted chocolate over the marshmallow and tilt the pan to coat evenly. Sprinkle flaky sea salt if using.
- Set and slice: Chill 30–45 minutes until the chocolate is just firm. Lift out with the parchment.
Warm a sharp knife under hot water, wipe dry, and cut into 16–20 small bars for sensible portions.
How to Store
- Short-term: Keep in an airtight container in the fridge for up to 5 days. Layer with parchment to prevent sticking.
- Freezer-friendly: Freeze cut bars on a tray until firm, then store in a freezer bag up to 2 months. Thaw in the fridge 30–45 minutes before serving.
- Room temp: For best texture, serve lightly chilled or at cool room temperature.
In warm kitchens, the chocolate can soften.
Benefits of This Recipe
- Low sugar, high satisfaction: Sweet but steady, without the crash.
- Gluten-free by default: Almond flour and coconut keep the crust tender and wheat-free.
- Smart portion control: Rich layers make small squares feel indulgent.
- Make-ahead friendly: Layers set well and cut cleanly the next day.
- Flexible sweeteners: Works with allulose for extra chew or erythritol blends for a firmer bite.

What Not to Do
- Don’t skip parchment: These bars are sticky; you need a sling to lift them out cleanly.
- Don’t overbake the crust: Too dark and it turns hard after chilling.
- Don’t let the marshmallow fully cool in the bowl: It sets quickly; spread it as soon as it’s whipped.
- Don’t overheat chocolate: Burnt chocolate seizes. Melt low and slow, and stir often.
- Don’t use granulated sweetener in the marshmallow without powdering: It can feel gritty. Use powdered or allulose for best texture.
Variations You Can Try
- Rocky road style: Fold 1/3 cup chopped toasted nuts into the marshmallow before spreading.
- Peppermint crunch: Add 1/4 teaspoon peppermint extract to the marshmallow and sprinkle crushed sugar-free peppermint on the chocolate.
- Mocha swirl: Stir 1 teaspoon instant espresso into the melted chocolate for a café vibe.
- Almond joy vibes: Add 1/4 cup toasted coconut on top of the marshmallow before the chocolate layer.
- Salted caramel note: Drizzle a thin line of keto caramel sauce over the marshmallow, then cover with chocolate.
FAQ
Can I use a different sweetener for the marshmallow?
Yes.
Allulose gives the softest, most authentic chew and no crystallization. Powdered erythritol/monk fruit also works but sets a little firmer. Avoid pure stevia alone; it won’t provide structure.
Do I need a stand mixer?
A stand mixer makes it easy, but a hand mixer on high speed works fine.
Plan for a minute or two more of whipping time to get the same volume.
Why did my chocolate layer crack when slicing?
The chocolate was too cold or too thick. Let the pan sit at room temp 10 minutes before slicing, and warm your knife. Adding a bit of coconut oil to the chocolate helps it slice cleanly.
My marshmallow turned grainy.
What happened?
Likely the sweetener crystallized. Use powdered sweetener or allulose, and make sure it fully dissolves in the hot syrup before whipping. Work quickly to spread while it’s still glossy.
Can I make this dairy-free?
Yes.
Use coconut oil instead of butter in the crust and for melting the chocolate. Choose dairy-free, sugar-free chocolate.
Is gelatin necessary?
For the classic marshmallow bounce, yes. Agar can be tricky here and tends to set more firmly, but advanced users can experiment with adjusted ratios.
How many net carbs per bar?
It depends on brand choices and cut size, but typically around 2–3 net carbs for a small square when using allulose or erythritol-based chocolate.
Calculate with your exact ingredients for accuracy.
Can I make these nut-free?
You can try a crust using finely ground sunflower seed flour instead of almond flour. Flavor will be slightly different, but it holds together nicely.
Wrapping Up
Keto Chocolate Marshmallow Bars bring that fluffy-meets-fudgy magic without the sugar load. With a quick almond-coconut crust, a simple gelatin marshmallow, and a smooth chocolate cap, you get a dessert that feels special and fits your macros.
Keep a batch in the fridge, slice them small, and you’re set for snacks, parties, or weeknight cravings. Make them once, and they’ll join your regular dessert rotation.
Printable Recipe Card
Want just the essential recipe details without scrolling through the article? Get our printable recipe card with just the ingredients and instructions.