Keto Toasted Coconut Cream Pie – A Low-Carb Classic With Big Flavor
If you love creamy pies but keep your carbs in check, this dessert is right up your alley. Keto Toasted Coconut Cream Pie is rich, velvety, and full of coconut flavor, with a golden, nutty crust that actually supports your goals. It tastes like a bakery treat but uses simple ingredients you can find at most grocery stores.
The texture is silky and smooth, the topping is fluffy and light, and the toasted coconut delivers that perfect crunch. It’s the kind of pie that wins over both keto and non-keto friends.
Ingredients
Method
- Toast the coconut: Preheat the oven to 325°F (163°C). Spread 1 1/2 cups unsweetened shredded coconut on a baking sheet. Bake 4–7 minutes, stirring once, until golden in spots and fragrant. Watch closely—coconut burns fast. Set aside to cool. Measure out 1 cup for the filling and 1/2 cup for topping.
- Make the crust: In a bowl, mix almond flour, coconut flour, sweetener, and salt. Stir in melted butter and vanilla until the mixture resembles damp sand and holds together when pressed. Press firmly into a 9-inch pie plate, going up the sides evenly.
- Par-bake the crust: Bake at 325°F for 12–15 minutes until lightly golden at the edges. Cool completely on a rack. The crust will firm as it cools.
- Bloom the gelatin: In a small bowl, sprinkle gelatin over 2 tablespoons cold water. Let stand 5 minutes.
- Start the custard: In a saucepan, whisk coconut milk, heavy cream, sweetener, and a pinch of salt. Heat over medium until steaming, not boiling. If using xanthan gum, sprinkle lightly and whisk vigorously to avoid clumps.
- Temper the yolks: In a separate bowl, whisk egg yolks. Slowly pour in about 1/2 cup of the hot cream mixture while whisking constantly. Return the yolk mixture to the saucepan, whisking as you go.
- Thicken the filling: Cook over medium-low heat, stirring constantly with a silicone spatula, until the mixture coats the back of the spatula and reaches about 170–175°F. Do not boil. Remove from heat.
- Melt in gelatin and flavor: Whisk the bloomed gelatin into the hot custard until dissolved. Stir in vanilla and coconut extract. Fold in 1 cup toasted coconut.
- Cool slightly: Let the filling sit 10–15 minutes, stirring a couple of times to release steam. This helps prevent a soggy crust.
- Fill the crust: Pour the warm filling into the cooled crust. Smooth the top. Cover loosely with plastic wrap, touching the surface to prevent a skin.
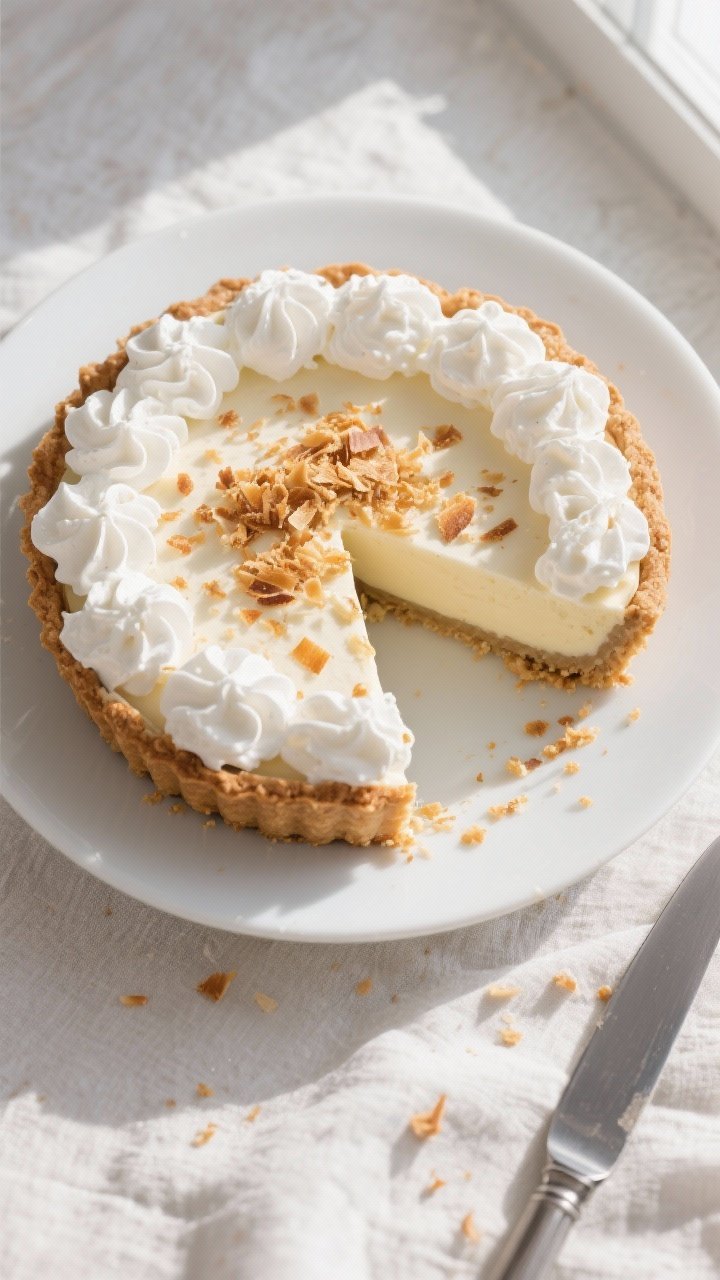
- Chill to set: Refrigerate at least 4 hours, preferably overnight, until firm and sliceable.
- Whip the topping: Beat the cold heavy cream, sweetener, and vanilla to soft peaks. Spread or pipe over the chilled pie.
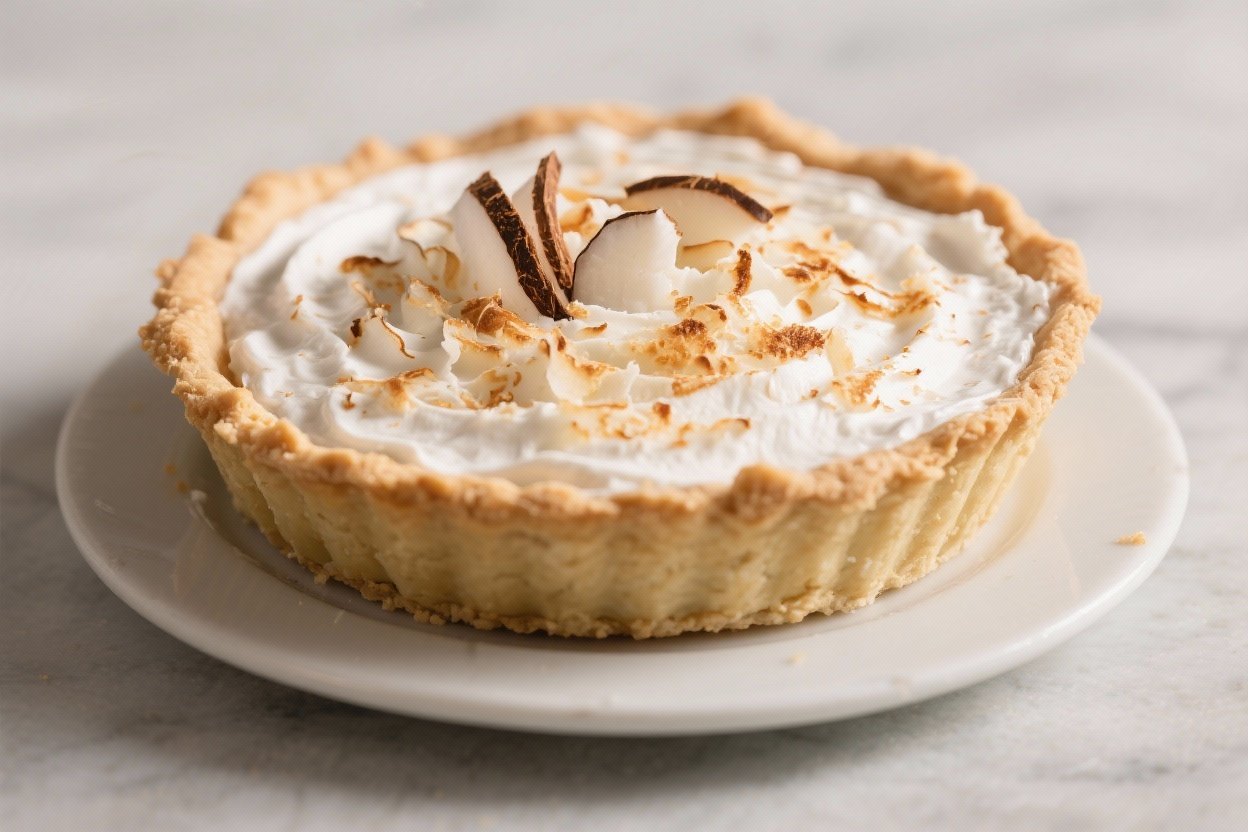
- Finish and serve: Sprinkle with the remaining 1/2 cup toasted coconut. Slice with a sharp knife wiped clean between cuts. Enjoy cold.
Overeating is a pattern. This helps you fix that problem. A quick reset for cravings, snacking, and “I’ll start tomorrow” moments.
Built for busy home cooks who want real-life structure. Simple steps that fit meal prep, family dinners, and late-night snack attacks.
What Makes This Recipe So Good
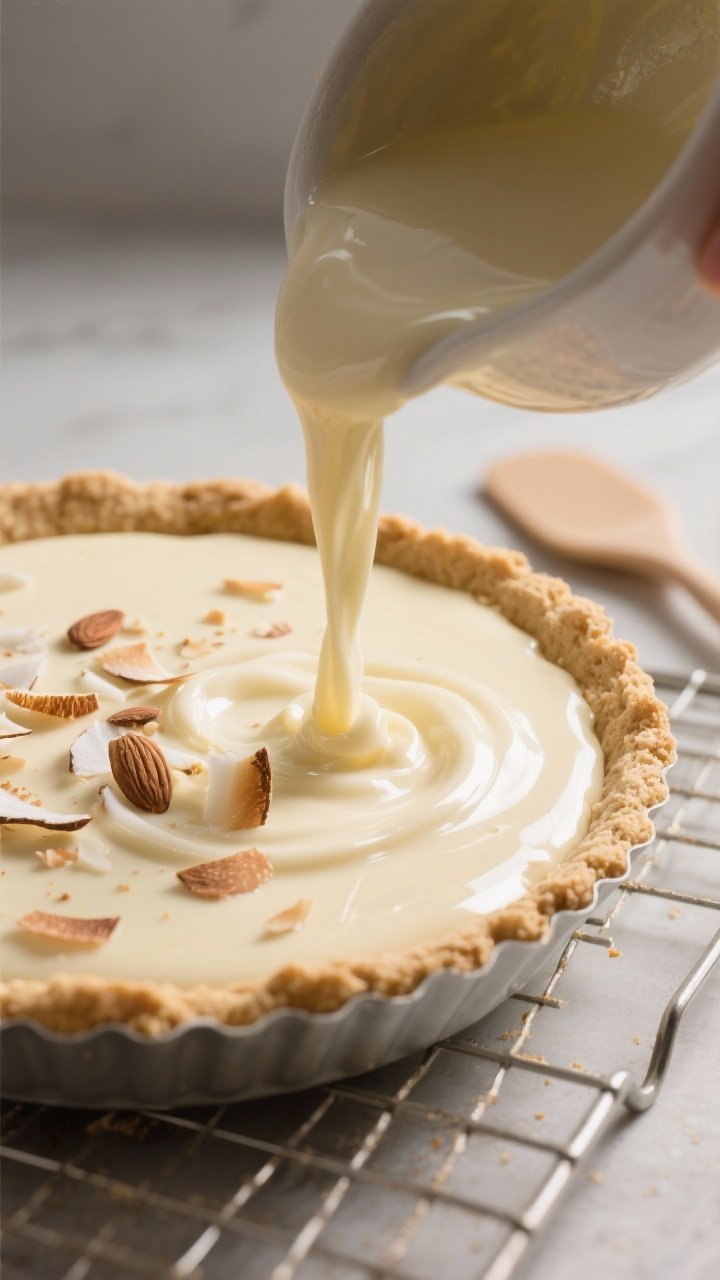
- Authentic coconut flavor: Toasted coconut adds deep, nutty sweetness without extra sugar.
- Low-carb crust: An almond flour and coconut flour crust bakes up crisp and buttery.
- Silky filling: A custard-style coconut cream filling thickened with egg yolks and gelatin for a stable, sliceable pie.
- Keto-friendly sweetener: Erythritol or allulose keeps it sweet without spiking blood sugar.
- Make-ahead friendly: The pie sets in the fridge and actually tastes better after chilling.
Ingredients
Crust
- 1 1/2 cups almond flour
- 2 tablespoons coconut flour
- 3 tablespoons granular erythritol or allulose
- 1/4 teaspoon fine sea salt
- 5 tablespoons unsalted butter, melted (or coconut oil)
- 1 teaspoon vanilla extract
Toasted Coconut
- 1 1/2 cups unsweetened shredded coconut, divided (1 cup for filling, 1/2 cup for topping)
Filling
- 1 (13.5-ounce) can full-fat coconut milk
- 1 cup heavy cream (or full-fat coconut cream for dairy-free)
- 1/2 cup granular or powdered erythritol/allulose (powdered blends dissolve best)
- 1/4 teaspoon xanthan gum (optional, for extra thickness)
- 3 large egg yolks
- 2 teaspoons unflavored powdered gelatin
- 2 tablespoons cold water
- 1 teaspoon vanilla extract
- 1/2 teaspoon coconut extract (optional but recommended)
- Pinch of salt
Whipped Topping
- 3/4 cup heavy cream, cold
- 2 tablespoons powdered erythritol/allulose
- 1/2 teaspoon vanilla extract
How to Make It
- Toast the coconut: Preheat the oven to 325°F (163°C). Spread 1 1/2 cups unsweetened shredded coconut on a baking sheet.
Bake 4–7 minutes, stirring once, until golden in spots and fragrant. Watch closely—coconut burns fast. Set aside to cool.
Measure out 1 cup for the filling and 1/2 cup for topping.
- Make the crust: In a bowl, mix almond flour, coconut flour, sweetener, and salt. Stir in melted butter and vanilla until the mixture resembles damp sand and holds together when pressed. Press firmly into a 9-inch pie plate, going up the sides evenly.
- Par-bake the crust: Bake at 325°F for 12–15 minutes until lightly golden at the edges.
Cool completely on a rack. The crust will firm as it cools.
- Bloom the gelatin: In a small bowl, sprinkle gelatin over 2 tablespoons cold water. Let stand 5 minutes.
- Start the custard: In a saucepan, whisk coconut milk, heavy cream, sweetener, and a pinch of salt.
Heat over medium until steaming, not boiling. If using xanthan gum, sprinkle lightly and whisk vigorously to avoid clumps.
- Temper the yolks: In a separate bowl, whisk egg yolks. Slowly pour in about 1/2 cup of the hot cream mixture while whisking constantly.
Return the yolk mixture to the saucepan, whisking as you go.
- Thicken the filling: Cook over medium-low heat, stirring constantly with a silicone spatula, until the mixture coats the back of the spatula and reaches about 170–175°F. Do not boil. Remove from heat.
- Melt in gelatin and flavor: Whisk the bloomed gelatin into the hot custard until dissolved.
Stir in vanilla and coconut extract. Fold in 1 cup toasted coconut.
- Cool slightly: Let the filling sit 10–15 minutes, stirring a couple of times to release steam. This helps prevent a soggy crust.
- Fill the crust: Pour the warm filling into the cooled crust.
Smooth the top. Cover loosely with plastic wrap, touching the surface to prevent a skin.
- Chill to set: Refrigerate at least 4 hours, preferably overnight, until firm and sliceable.
- Whip the topping: Beat the cold heavy cream, sweetener, and vanilla to soft peaks. Spread or pipe over the chilled pie.
- Finish and serve: Sprinkle with the remaining 1/2 cup toasted coconut.
Slice with a sharp knife wiped clean between cuts. Enjoy cold.
Keeping It Fresh
- Refrigeration: Cover the pie loosely and refrigerate up to 4 days. The crust stays crisp if well-baked and cooled before filling.
- Freezing: For best texture, freeze slices without whipped topping.
Wrap well and freeze up to 1 month. Thaw overnight in the fridge, then add fresh whipped cream and coconut.
- Prevent sogginess: Let the filling cool slightly before pouring into the crust, and avoid warm kitchens when assembling.

Why This is Good for You
- Lower in carbs: Almond and coconut flours replace traditional flour, keeping net carbs low per slice.
- Healthy fats: Coconut milk, cream, and nuts deliver satisfying fats that help keep you full.
- No added sugar: Using erythritol or allulose cuts sugar while keeping the flavor sweet and clean.
- Protein support: Egg yolks add a touch of protein and essential nutrients like choline.
What Not to Do
- Don’t skip toasting the coconut: Raw coconut tastes flat. Toasting makes a big difference.
- Don’t boil the custard: Boiling can curdle the eggs.
Gentle heat gives a smooth texture.
- Don’t use light coconut milk: You need full-fat for body and flavor.
- Don’t rush the chill: The pie needs several hours to set. Cutting early leads to runny slices.
- Don’t over-sweeten: Many keto sweeteners taste sweeter than sugar. Start with the listed amount and adjust next time.
Recipe Variations
- Dairy-free: Use coconut oil in the crust and full-fat coconut cream in place of heavy cream for both filling and topping.
Whip a chilled can of coconut cream with sweetener for the topping.
- Chocolate drizzle: Melt sugar-free dark chocolate with a teaspoon of coconut oil and drizzle over the finished pie.
- Lime twist: Add 1–2 teaspoons lime zest and 1 tablespoon lime juice to the filling for a tropical vibe.
- Macadamia crust: Replace 1/2 cup almond flour with finely chopped macadamias for extra crunch.
- Toasted almond topping: Mix sliced almonds with the toasted coconut for a bakery-style finish.
FAQ
Can I make this ahead?
Yes. The pie actually improves after a night in the fridge. You can make it up to two days in advance and add the whipped topping just before serving.
Which sweetener works best?
Powdered allulose dissolves cleanly and gives a silky texture.
Powdered erythritol works too but can feel slightly cooler on the tongue. Avoid liquid stevia alone, as it can taste bitter in custards.
How do I prevent the crust from crumbling?
Press it in firmly, especially up the sides, and bake until lightly golden. Let it cool fully before adding the filling.
A removable-bottom tart pan also helps with clean slices.
Do I have to use gelatin?
Gelatin ensures clean slices and a stable set. If you skip it, the pie will be softer and may weep when cut. For a pescatarian option, you can try agar-agar, but use less and test for firmness—it sets more firmly than gelatin.
Can I use sweetened shredded coconut?
It’s not keto-friendly and will raise carbs significantly.
Stick with unsweetened shredded or flaked coconut for the best results.
What if my custard gets lumpy?
Take it off the heat and whisk vigorously. If needed, strain it through a fine-mesh sieve before adding the toasted coconut. It will still set nicely.
How many carbs per slice?
Exact macros depend on your brands and sweetener, but most versions land around 5–7 net carbs per slice when cut into 12 servings.
Use a nutrition calculator with your specific ingredients for precision.
Wrapping Up
Keto Toasted Coconut Cream Pie brings a classic dessert back to your table without the sugar crash. With a crisp, nutty crust and a creamy coconut filling, it feels indulgent but stays low-carb. Make it ahead, keep it chilled, and watch it disappear slice by slice.
It’s simple enough for a weekday treat and special enough for a holiday spread. When you want comfort and freshness in one bite, this pie delivers every time.
Printable Recipe Card
Want just the essential recipe details without scrolling through the article? Get our printable recipe card with just the ingredients and instructions.