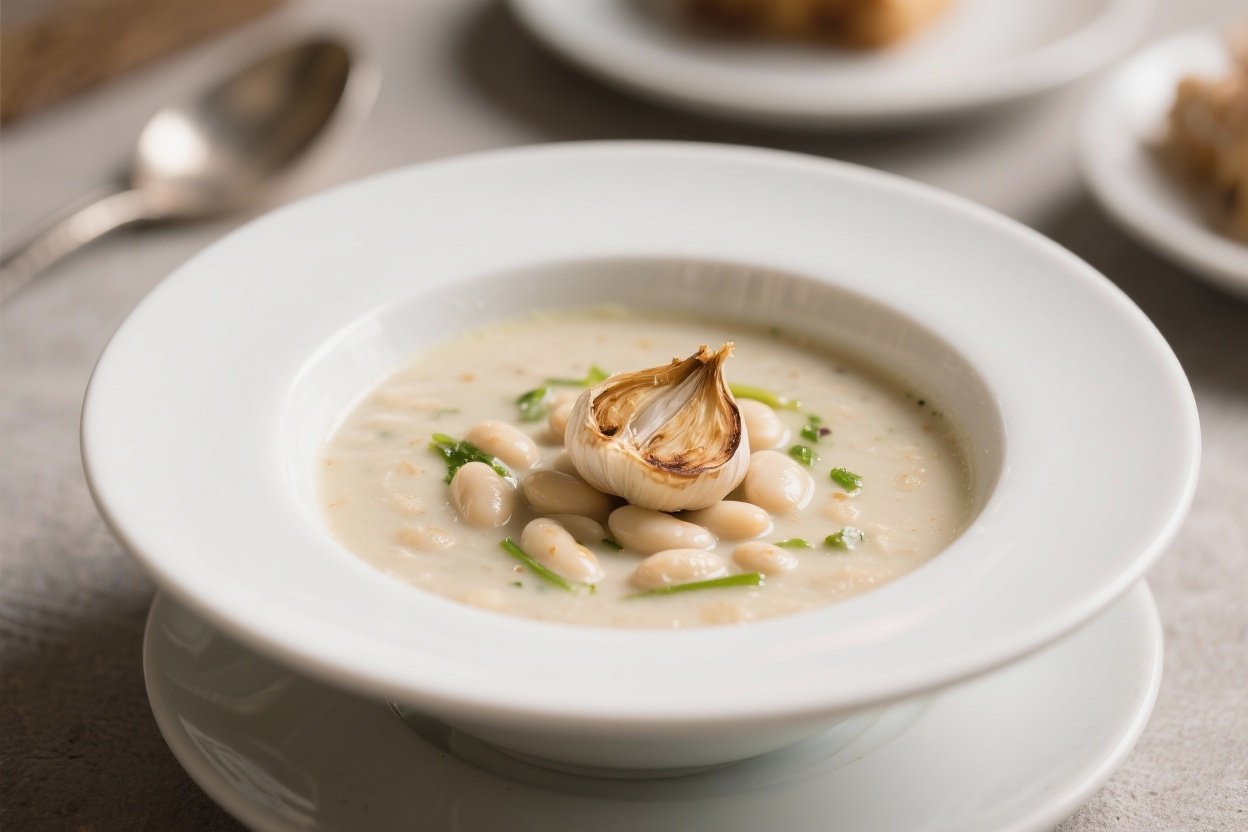
Roasted Garlic White Bean Soup – Creamy, Cozy, and Comforting
Roasted garlic white bean soup is the kind of meal that feels like a hug on a cool evening. It’s silky, savory, and full of deep roasted flavor, yet surprisingly simple to make. With a few pantry staples and a head of garlic, you’ll have a satisfying bowl that tastes restaurant-worthy.
This soup is naturally creamy without heavy cream and comes together in under an hour. It’s great for weeknights, easy to scale, and perfect with a hunk of bread.
Ingredients
Method
- Roast the garlic: Heat the oven to 400°F (200°C). Slice the top off the garlic head to expose the cloves. Drizzle with olive oil, wrap tightly in foil, and roast for 35–40 minutes until soft and golden. Let cool slightly.
- Sauté the aromatics: In a large pot, warm 2 tablespoons olive oil over medium heat. Add onion, celery, and carrot (if using). Season with a pinch of salt and cook 6–8 minutes, stirring, until tender and translucent.
- Add herbs and seasonings: Stir in thyme, rosemary, black pepper, and the bay leaf. Cook 1 minute until fragrant.
- Add beans and broth: Add the rinsed beans and pour in the broth. Squeeze the roasted garlic cloves out of their skins directly into the pot. Stir to combine.
- Simmer: Bring to a gentle boil, then reduce to a simmer. Cook 10–15 minutes to let the flavors meld. Taste and add salt if needed.
- Blend to your preferred texture: Remove the bay leaf. Use an immersion blender to blend until smooth and creamy. For some texture, blend only half the soup. If using a stand blender, work in batches and vent the lid.
- Finish and brighten: Stir in the lemon juice and a pinch of red pepper flakes if using. Adjust seasoning with more salt, pepper, or lemon to taste. If too thick, add a splash of broth or water until it’s where you want it.
- Serve: Ladle into bowls and garnish with chopped parsley or chives. Drizzle with a little olive oil and serve with crusty bread.
Overeating is a pattern. This helps you fix that problem. A quick reset for cravings, snacking, and “I’ll start tomorrow” moments.
Built for busy home cooks who want real-life structure. Simple steps that fit meal prep, family dinners, and late-night snack attacks.
Why This Recipe Works
- Roasted garlic brings depth: Roasting softens garlic’s bite and turns it sweet and nutty, giving the soup a rich, rounded flavor.
- White beans create natural creaminess: Blending cannellini or great northern beans gives a velvety texture without dairy.
- Simple aromatics, big payoff: Onion, celery, and thyme lay a savory foundation that complements the garlic rather than competing with it.
- Flexible liquid: Vegetable or chicken broth both work. You can keep it vegan or not—your call.
- Blends beautifully: An immersion blender makes the process easy and mess-free.
You can also blend partially for a mix of creamy and chunky textures.
Ingredients
- 1 large head of garlic
- 2 tablespoons olive oil, plus more for roasting
- 1 medium yellow onion, diced
- 2 celery stalks, diced
- 1 medium carrot, diced (optional, for a hint of sweetness)
- 1 teaspoon kosher salt, plus more to taste
- 1/2 teaspoon freshly ground black pepper
- 1 teaspoon dried thyme or 2 teaspoons fresh thyme leaves
- 1/2 teaspoon dried rosemary or 1 teaspoon chopped fresh rosemary
- 1 bay leaf
- 2 cans (15 ounces each) cannellini or great northern beans, drained and rinsed
- 4 cups vegetable or chicken broth
- 1 tablespoon lemon juice, plus more to taste
- Red pepper flakes, to taste (optional)
- Fresh parsley or chives, chopped, for garnish (optional)
- Crusty bread or toasted baguette, for serving (optional)
How to Make It
- Roast the garlic: Heat the oven to 400°F (200°C). Slice the top off the garlic head to expose the cloves. Drizzle with olive oil, wrap tightly in foil, and roast for 35–40 minutes until soft and golden.
Let cool slightly.
- Sauté the aromatics: In a large pot, warm 2 tablespoons olive oil over medium heat. Add onion, celery, and carrot (if using). Season with a pinch of salt and cook 6–8 minutes, stirring, until tender and translucent.
- Add herbs and seasonings: Stir in thyme, rosemary, black pepper, and the bay leaf.
Cook 1 minute until fragrant.
- Add beans and broth: Add the rinsed beans and pour in the broth. Squeeze the roasted garlic cloves out of their skins directly into the pot. Stir to combine.
- Simmer: Bring to a gentle boil, then reduce to a simmer.
Cook 10–15 minutes to let the flavors meld. Taste and add salt if needed.
- Blend to your preferred texture: Remove the bay leaf. Use an immersion blender to blend until smooth and creamy.
For some texture, blend only half the soup. If using a stand blender, work in batches and vent the lid.
- Finish and brighten: Stir in the lemon juice and a pinch of red pepper flakes if using. Adjust seasoning with more salt, pepper, or lemon to taste.
If too thick, add a splash of broth or water until it’s where you want it.
- Serve: Ladle into bowls and garnish with chopped parsley or chives. Drizzle with a little olive oil and serve with crusty bread.
How to Store
- Refrigerator: Store in an airtight container for 4–5 days. The flavors deepen over time.
- Freezer: Freeze for up to 3 months.
Cool completely, then freeze in portions. Thaw in the fridge overnight and reheat gently on the stove with a splash of water or broth.
- Reheating: Warm over low to medium heat, stirring occasionally. Add liquid if it thickens in the fridge.

Benefits of This Recipe
- Budget-friendly: Beans and aromatics are inexpensive pantry staples that stretch into multiple servings.
- High in plant-based protein and fiber: White beans help keep you full and satisfied.
- Naturally creamy without heavy cream: Great for those who prefer lighter, dairy-free soups.
- Customizable: Easy to adjust seasoning, thickness, and toppings based on your tastes.
- Meal-prep friendly: Stores and reheats well for lunches or quick dinners.
What Not to Do
- Don’t skip roasting the garlic: Raw garlic will make the soup sharp and harsh, not mellow and sweet.
- Don’t forget to rinse canned beans: Rinsing improves flavor and reduces excess starch and sodium.
- Don’t blend with the bay leaf: Always remove it before blending to avoid bitterness.
- Don’t boil aggressively after blending: High heat can dull flavors and thicken the soup too much.
- Don’t skip the acid: A touch of lemon at the end brightens and balances the richness.
Recipe Variations
- Herby spinach swirl: Stir in a few handfuls of baby spinach at the end until just wilted.
Add extra lemon and fresh dill or parsley.
- Smoky paprika twist: Add 1 teaspoon smoked paprika with the herbs. Finish with a drizzle of chili oil.
- Creamy Parmesan (not vegan): Stir in 1/3 cup finely grated Parmesan after blending for extra umami.
- Crunchy topping: Fry breadcrumbs in olive oil with garlic and parsley. Sprinkle over bowls for texture.
- Protein boost: Add shredded rotisserie chicken or sautéed mushrooms for a heartier bowl.
- Caramelized onion base: Cook the onions low and slow until deeply golden before adding other aromatics for extra sweetness.
- Cannellini + cauliflower: Add 2 cups small cauliflower florets to the pot and simmer until tender before blending for extra body.
- Coconut-lemon: Replace 1 cup of broth with light coconut milk and finish with lots of lemon zest and juice.
FAQ
Can I use dried beans instead of canned?
Yes.
Soak 1 cup dried white beans overnight, drain, then simmer in fresh water until tender (about 60–90 minutes). Use about 3 cups cooked beans in the recipe. You may need a bit more salt.
What if I don’t have an immersion blender?
Use a stand blender and blend in batches.
Vent the lid slightly and cover with a towel to let steam escape. Blend until smooth, then return to the pot.
How can I make it thicker or thinner?
For thicker soup, simmer longer after blending or add an extra half can of beans. For a thinner soup, stir in more broth or water a little at a time until it reaches your preferred consistency.
Is this soup vegan?
It can be.
Use vegetable broth and skip any dairy garnishes. The base recipe is naturally dairy-free.
What can I serve with this soup?
Crusty bread, toasted baguette, a simple green salad, or roasted vegetables all pair nicely. A grilled cheese or pesto toast makes it extra cozy.
Can I roast garlic ahead of time?
Absolutely.
Roast several heads at once and store the cloves in the fridge, covered in olive oil, for up to a week. They’re great for soups, spreads, and sauces.
How do I avoid a bitter taste?
Remove the bay leaf before blending, don’t burn the garlic or herbs, and finish with lemon juice to balance flavors. Taste as you go and adjust salt.
Which beans work best?
Cannellini and great northern beans blend smoothly and have a mild flavor.
Navy beans also work. Choose low-sodium canned beans when possible.
Final Thoughts
Roasted garlic white bean soup proves that simple ingredients can deliver big flavor. It’s creamy, comforting, and easy to adapt to whatever you have on hand.
With roasted garlic as the star, you get a mellow richness that tastes like it simmered all day. Keep this recipe in your weeknight rotation, and you’ll always have a cozy, nourishing meal ready to go. Add your favorite garnishes, grab some bread, and enjoy.
Printable Recipe Card
Want just the essential recipe details without scrolling through the article? Get our printable recipe card with just the ingredients and instructions.