Taco Stuffed Bell Peppers – A Fresh, Satisfying Weeknight Favorite
If you love tacos and want something a bit lighter without losing the flavor, these Taco Stuffed Bell Peppers are a perfect pick. They’re hearty, colorful, and easy to make on a busy weeknight. The filling is savory, cheesy, and full of classic taco goodness.
You get the crunch and sweetness of bell peppers with a warm, spiced taco filling. It’s comfort food that still feels fresh and wholesome.

Ingredients
Method
- Prep the peppers. Preheat your oven to 375°F (190°C). Slice the tops off the bell peppers and remove seeds and membranes. If needed, shave a thin slice from the base so they stand upright. Place in a baking dish, cut side up.
- Soften the peppers (optional). For softer peppers, brush with a little olive oil and bake for 10 minutes while you make the filling. For crisper peppers, skip this step.
- Cook the aromatics. Heat olive oil in a large skillet over medium heat. Add diced onion and cook 3–4 minutes until softened. Stir in garlic and cook 30 seconds until fragrant.
- Brown the meat. Add ground meat to the skillet. Cook, breaking it up, until no longer pink. Drain excess fat if needed.
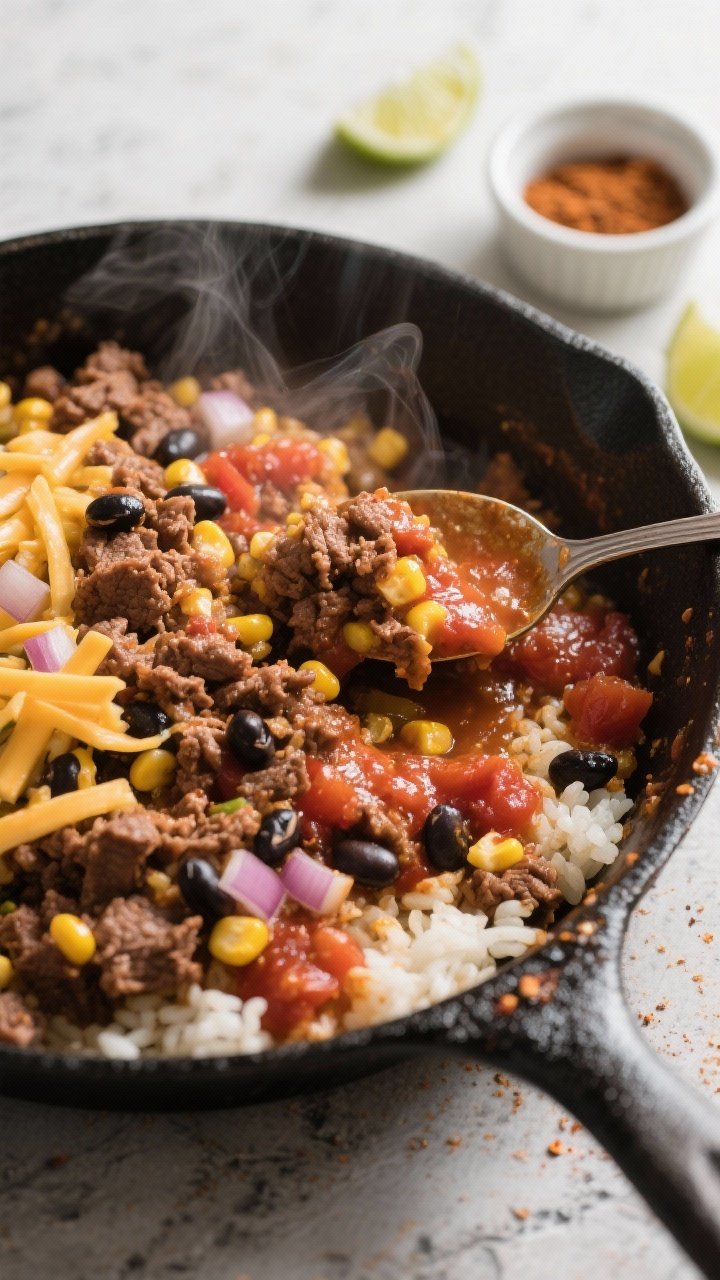
- Season and simmer. Stir in taco seasoning, tomato sauce or salsa, beans, corn, and cooked rice. Add a splash of water if it looks dry. Simmer 2–3 minutes. Taste and adjust salt and pepper.
- Stir in some cheese. Mix in a small handful of shredded cheese so the filling holds together. Save most of the cheese for topping.
- Stuff the peppers. Spoon the filling into each pepper, packing it gently to the top. Sprinkle generously with the remaining cheese.
- Bake. Cover the dish loosely with foil and bake for 20 minutes. Remove the foil and bake another 10–15 minutes, until the peppers are tender and the cheese is bubbly and golden.
- Finish and serve. Let cool for 5 minutes. Top with cilantro, a squeeze of lime, and your favorite toppings. Serve warm.
Transform Your Body in just 6-Weeks. Get Fit, Save Time, and Eat Smart.
Ready to get real results without long workouts or complicated diets? Our 6-week plan is made for busy people who want quick wins and lasting changes.
Get Your Program TodayWhat Makes This Special
These stuffed peppers deliver all the best parts of taco night with fewer dishes and a fun, veggie-forward twist. The recipe is flexible, so you can use ground beef, turkey, chicken, or a plant-based crumble.
Plus, it’s a complete meal in one: protein, veggies, and optional grains. The peppers keep everything tidy, and the topping options make each plate feel personal and customizable.
What You’ll Need
- Bell peppers (4–6 large) – Any color works, but red, yellow, and orange are sweeter.
- Ground meat (1 lb) – Beef, turkey, chicken, or plant-based crumbles.
- Cooked rice (1 cup) – White, brown, or cauliflower rice for low-carb.
- Onion (1 small), diced
- Garlic (2–3 cloves), minced
- Tomato sauce or salsa (1 cup) – Adds moisture and flavor.
- Black beans or pinto beans (1 cup), drained and rinsed – Optional but filling.
- Corn kernels (1/2 cup) – Fresh, frozen, or canned.
- Taco seasoning (2–3 tbsp) – Store-bought or homemade.
- Shredded cheese (1–1 1/2 cups) – Cheddar, Monterey Jack, or a blend.
- Olive oil (1–2 tbsp)
- Salt and pepper to taste
- Fresh cilantro, lime wedges for serving
- Optional toppings: sour cream or Greek yogurt, avocado, jalapeño slices, green onions, hot sauce
Step-by-Step Instructions

- Prep the peppers. Preheat your oven to 375°F (190°C). Slice the tops off the bell peppers and remove seeds and membranes.
If needed, shave a thin slice from the base so they stand upright. Place in a baking dish, cut side up.
- Soften the peppers (optional). For softer peppers, brush with a little olive oil and bake for 10 minutes while you make the filling. For crisper peppers, skip this step.
- Cook the aromatics. Heat olive oil in a large skillet over medium heat.
Add diced onion and cook 3–4 minutes until softened. Stir in garlic and cook 30 seconds until fragrant.
- Brown the meat. Add ground meat to the skillet. Cook, breaking it up, until no longer pink.
Drain excess fat if needed.
- Season and simmer. Stir in taco seasoning, tomato sauce or salsa, beans, corn, and cooked rice. Add a splash of water if it looks dry. Simmer 2–3 minutes.
Taste and adjust salt and pepper.
- Stir in some cheese. Mix in a small handful of shredded cheese so the filling holds together. Save most of the cheese for topping.
- Stuff the peppers. Spoon the filling into each pepper, packing it gently to the top. Sprinkle generously with the remaining cheese.
- Bake. Cover the dish loosely with foil and bake for 20 minutes.
Remove the foil and bake another 10–15 minutes, until the peppers are tender and the cheese is bubbly and golden.
- Finish and serve. Let cool for 5 minutes. Top with cilantro, a squeeze of lime, and your favorite toppings. Serve warm.
How to Store
- Refrigerator: Store leftovers in an airtight container for up to 4 days.
Reheat in the oven at 350°F (175°C) for 10–15 minutes or in the microwave in 60-second bursts.
- Freezer: Freeze baked, cooled peppers individually on a tray, then transfer to freezer bags. Keep up to 2 months. Thaw overnight in the fridge and reheat at 350°F (175°C) until hot.
- Make-ahead: Prep the filling and peppers separately up to 2 days ahead.
Assemble and bake when ready to eat.

Health Benefits
- Veggie boost: Bell peppers are rich in vitamin C, antioxidants, and fiber.
- Balanced meal: You get protein from the meat or beans, complex carbs from rice or beans, and healthy fats from toppings like avocado.
- Customizable nutrition: Swap white rice for brown or quinoa for extra fiber. Use cauliflower rice for a low-carb version.
- Portion control: Each pepper half makes a tidy serving, which helps with mindful eating.
Common Mistakes to Avoid
- Undercooking the peppers: If you prefer them tender, pre-bake or bake a bit longer. Crunchy peppers can be great, but make it a choice, not an accident.
- Dry filling: Without enough sauce or moisture, the filling can taste bland.
Add tomato sauce or salsa and don’t skip the simmer.
- Overstuffing: Pack firmly but not so tight that the peppers split or the filling can’t heat through.
- Skipping seasoning: Taste as you go. Adjust salt, pepper, and taco seasoning to keep flavors bold.
- Watery peppers: If using very watery salsa, simmer longer to reduce. Drain beans and corn well.
Variations You Can Try
- Southwest chicken: Use shredded rotisserie chicken, black beans, corn, and chipotle powder for smoky heat.
- Veggie-forward: Use plant-based crumbles or extra beans, add diced zucchini or mushrooms, and use cauliflower rice.
- Breakfast style: Mix scrambled eggs with chorizo, peppers, and cheese.
Top with salsa verde.
- Low-dairy: Skip the cheese inside and finish with avocado slices and a dollop of dairy-free yogurt.
- Quinoa upgrade: Swap rice for cooked quinoa for extra protein and a nutty bite.
- Spicy lovers: Add jalapeños to the filling and finish with a drizzle of hot sauce.
FAQ
Do I Need to Precook the Bell Peppers?
No, but it depends on your texture preference. Precooking for 10 minutes makes them softer. If you like more bite, skip it and add a few extra minutes to the bake time if needed.
Can I Make These Without Rice?
Yes.
Replace rice with extra beans, quinoa, or cauliflower rice. If you omit grains entirely, add a little more sauce so the filling isn’t dry.
What’s the Best Cheese to Use?
Cheddar, Monterey Jack, or a Mexican blend melt well and add flavor. Pepper Jack is great if you want heat.
Use what you enjoy and what melts nicely.
How Do I Keep the Filling From Getting Watery?
Drain beans and corn thoroughly and simmer the filling until excess liquid evaporates. If using salsa, choose a thicker style or reduce it in the pan.
Can I Cook These in an Air Fryer?
Yes. Air fry at 360°F (182°C) for 10–15 minutes, depending on pepper size and whether you pre-soften them.
Work in batches and check at the 10-minute mark.
What If I Don’t Have Taco Seasoning?
Use a mix of chili powder, cumin, paprika, garlic powder, onion powder, oregano, salt, and a pinch of cayenne. Adjust to taste.
How Do I Make It Spicier?
Add diced jalapeños or chipotles in adobo to the filling, use Pepper Jack cheese, and finish with hot sauce or crushed red pepper flakes.
Can I Use Mini Peppers for Appetizers?
Absolutely. Halve mini peppers lengthwise, remove seeds, and stuff with a spoon.
Bake 10–12 minutes until the cheese is melted and peppers are tender.
In Conclusion
Taco Stuffed Bell Peppers are a reliable, flavorful meal that fits weeknights and meal prep alike. They’re easy to customize and packed with fresh, satisfying ingredients. With a few pantry staples and bright toppings, you’ll have a dinner that feels special without a lot of fuss.
Keep this one in your rotation—you’ll come back to it often.
Printable Recipe Card
Want just the essential recipe details without scrolling through the article? Get our printable recipe card with just the ingredients and instructions.