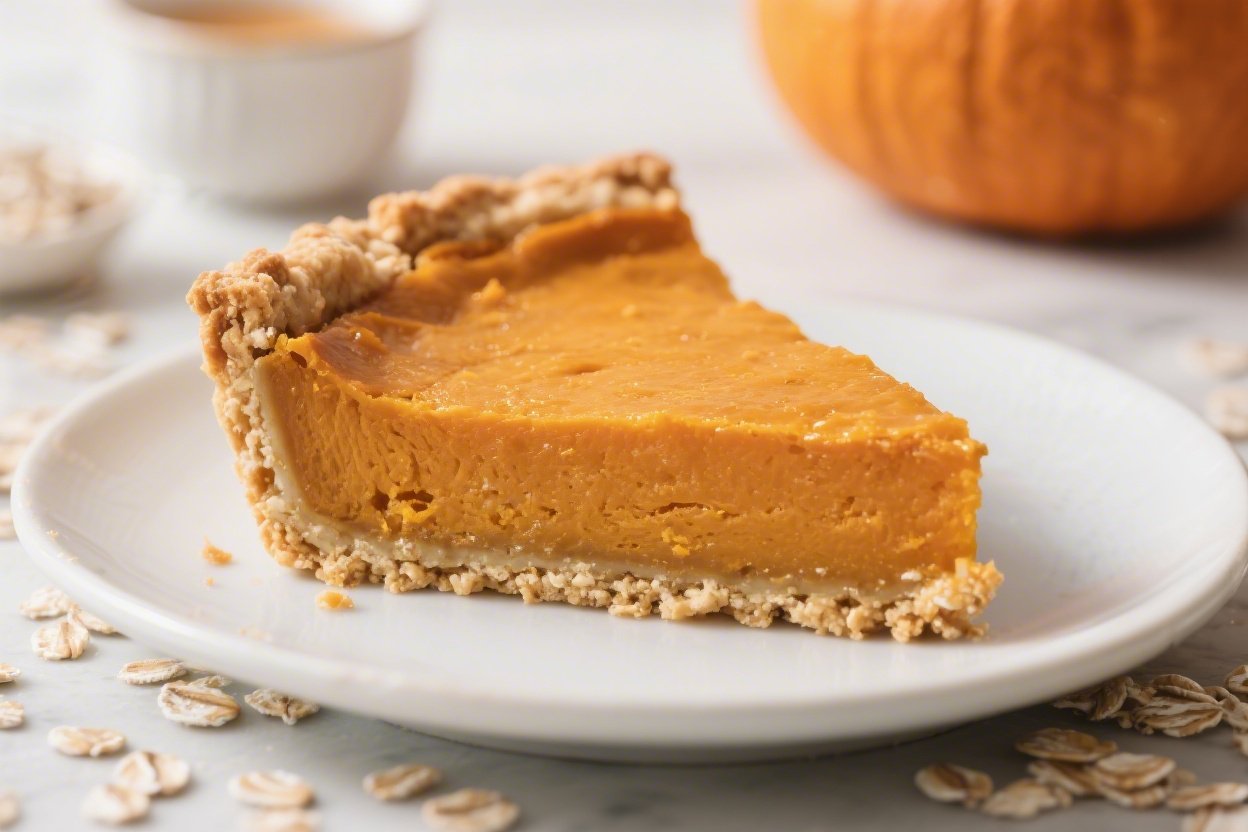
Oat Crust Pumpkin Pie – Cozy, Nutty, and Naturally Sweet
Pumpkin pie doesn’t have to mean a dense crust and a sugar rush. This version leans into a toasty oat crust that’s hearty, crisp, and quietly nutty. It’s simple to make, easy to slice, and has that classic pumpkin spice flavor everyone looks forward to.
Need More Easy Dinner Ideas?
Get my FREE 7-Day Easy Dinner Reset and enjoy a full week of healthy dinners without the meal-planning stress.
The texture is silky, the sweetness is balanced, and the crust adds just enough chew. Whether you’re planning a holiday menu or a weekend baking project, this pie hits the comfort sweet spot without feeling heavy.
Ingredients
Method
- Heat the oven. Set to 350°F (175°C). Place a rack in the lower-middle position.
- Prepare the pan. Lightly grease a 9-inch pie dish. For easier slicing, you can line the bottom with a round of parchment.
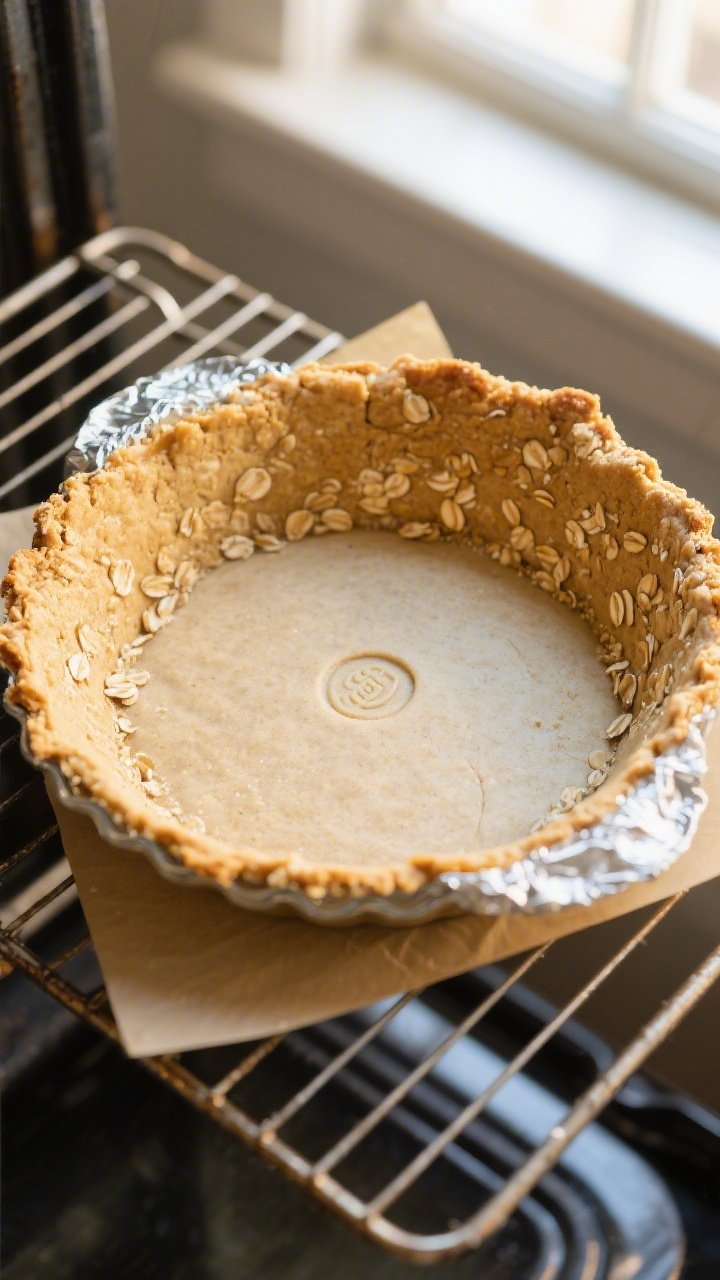
- Make the oat crust. In a food processor, pulse the oats until they’re a coarse meal with some texture left. Add almond flour, brown sugar, and salt. Pulse to combine. Drizzle in melted butter and maple syrup; pulse until the mixture holds together when pressed. If dry, add cold water 1 teaspoon at a time.
- Press and pre-bake. Press the mixture evenly into the bottom and up the sides of the pie dish. Use the bottom of a measuring cup to compact it firmly. Bake for 10–12 minutes until set and lightly golden. Let it cool while you mix the filling.
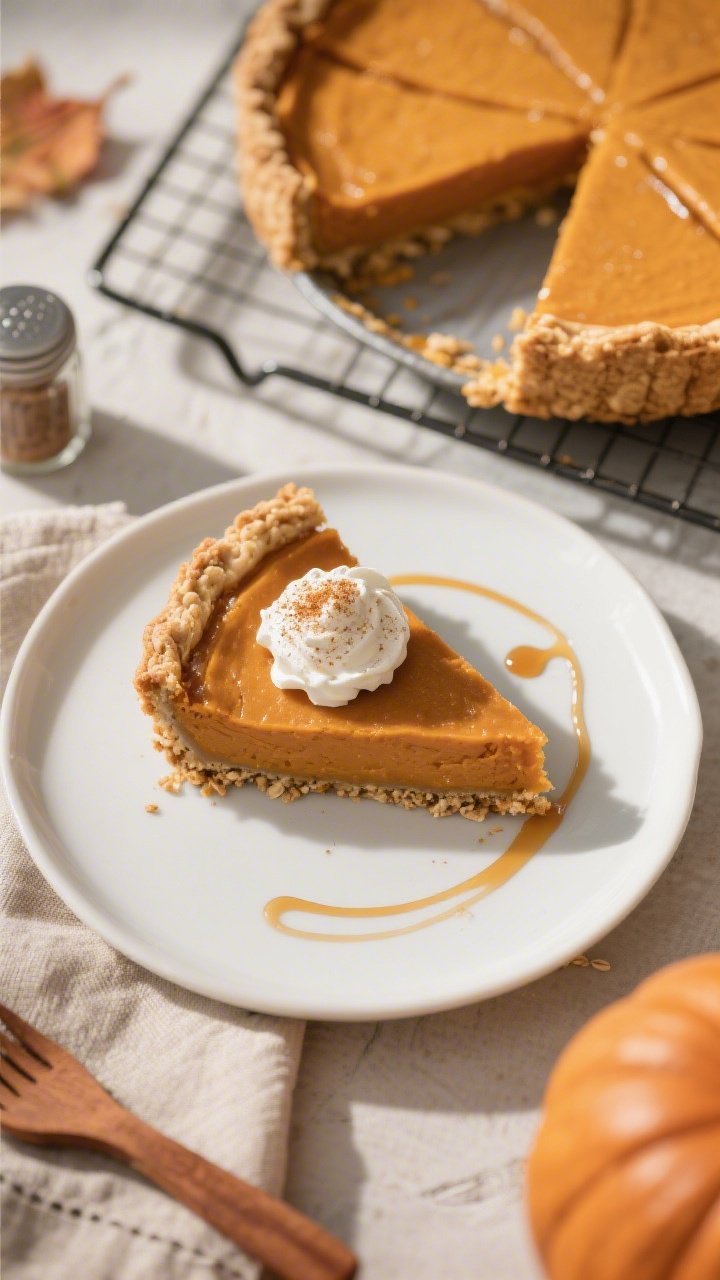
- Mix the filling. In a large bowl, whisk pumpkin, eggs, brown sugar, maple syrup, evaporated milk, vanilla, spices, and salt until smooth. Avoid whipping too much air into it.
- Fill and bake. Pour the filling into the warm crust. Bake 40–50 minutes, until the edges are set and the center has a gentle wobble. If the crust browns too quickly, tent the edges with foil.
- Cool properly. Set the pie on a rack. Cool to room temperature, about 2–3 hours. This helps the custard finish setting and makes cleaner slices.
- Serve. Slice with a sharp knife. Serve plain or with a dollop of whipped cream. For the neatest slices, chill 2 hours before cutting.
Why This Recipe Works
- Oat crust = flavor and texture. Rolled oats, a little almond flour (or finely ground nuts), and butter create a crisp, rustic crust that doesn’t get soggy under the filling.
- No blind-bake stress. A quick pre-bake sets the crust so it stays sturdy and holds together when sliced.
- Balanced sweetness. A mix of brown sugar and maple syrup gives warmth without overwhelming the pumpkin.
- Smooth, custardy filling. Pumpkin puree and eggs create a creamy center that sets cleanly and slices beautifully.
- Make-ahead friendly. The pie keeps well, tastes even better the next day, and travels like a champ.
Ingredients
- For the oat crust:
- 1 1/2 cups old-fashioned rolled oats
- 1/2 cup almond flour (or finely ground almonds; see variations for nut-free)
- 2 tablespoons brown sugar
- 1/4 teaspoon fine sea salt
- 6 tablespoons unsalted butter, melted and slightly cooled
- 1 tablespoon maple syrup
- 1–2 tablespoons cold water, as needed
- For the pumpkin filling:
- 1 (15-ounce) can pumpkin puree (not pumpkin pie filling)
- 3 large eggs, at room temperature
- 3/4 cup light brown sugar, packed
- 1/4 cup pure maple syrup
- 3/4 cup evaporated milk (or half-and-half for richer texture)
- 1 teaspoon pure vanilla extract
- 1 1/2 teaspoons ground cinnamon
- 1/2 teaspoon ground ginger
- 1/4 teaspoon ground nutmeg
- 1/8 teaspoon ground cloves (optional)
- 1/2 teaspoon fine sea salt
- To serve (optional): Lightly sweetened whipped cream or Greek yogurt
Instructions
- Heat the oven. Set to 350°F (175°C). Place a rack in the lower-middle position.
- Prepare the pan. Lightly grease a 9-inch pie dish.
For easier slicing, you can line the bottom with a round of parchment.
- Make the oat crust. In a food processor, pulse the oats until they’re a coarse meal with some texture left. Add almond flour, brown sugar, and salt. Pulse to combine.
Drizzle in melted butter and maple syrup; pulse until the mixture holds together when pressed. If dry, add cold water 1 teaspoon at a time.
- Press and pre-bake. Press the mixture evenly into the bottom and up the sides of the pie dish. Use the bottom of a measuring cup to compact it firmly.
Bake for 10–12 minutes until set and lightly golden. Let it cool while you mix the filling.
- Mix the filling. In a large bowl, whisk pumpkin, eggs, brown sugar, maple syrup, evaporated milk, vanilla, spices, and salt until smooth. Avoid whipping too much air into it.
- Fill and bake. Pour the filling into the warm crust.
Bake 40–50 minutes, until the edges are set and the center has a gentle wobble. If the crust browns too quickly, tent the edges with foil.
- Cool properly. Set the pie on a rack. Cool to room temperature, about 2–3 hours.
This helps the custard finish setting and makes cleaner slices.
- Serve. Slice with a sharp knife. Serve plain or with a dollop of whipped cream. For the neatest slices, chill 2 hours before cutting.
Storage Instructions
- Refrigerate: Cover and chill for up to 4 days.
The crust stays pleasantly firm.
- Freeze: Wrap slices tightly and freeze for up to 2 months. Thaw overnight in the fridge.
- Reheat: Warm slices at 300°F (150°C) for 10–12 minutes or enjoy cold.
Why This is Good for You
- Fiber boost: Oats add soluble fiber, which supports steady energy and helps you feel satisfied.
- Vitamin-rich: Pumpkin is packed with beta-carotene (vitamin A), plus potassium and fiber.
- Smarter sweetness: Brown sugar and maple bring big flavor, so you use less overall.
- Healthy fats: Almond flour contributes vitamin E and a tender texture.
What Not to Do
- Don’t skip the pre-bake. The crust needs that head start to avoid turning soft.
- Don’t use pumpkin pie filling. It’s pre-sweetened and spiced, which throws off the balance.
- Don’t overbake. If the center is fully firm in the oven, it will be dry once cooled.
- Don’t cut too soon. Slicing while warm leads to messy edges and a weepy center.
- Don’t pulverize the oats to dust. You want a bit of texture for structure and crunch.
Recipe Variations
Never Wonder What's For Dinner Again
Save time, eat healthier, and take the stress out of dinner. Get a full week of easy healthy dinners delivered straight to your inbox.
- Nut-free crust: Swap almond flour for oat flour or finely ground sunflower seeds. Add 1 extra tablespoon butter if the mix seems dry.
- Dairy-free: Use coconut oil instead of butter in the crust and full-fat coconut milk in the filling.
Expect a subtle coconut note.
- Gluten-free: Use certified gluten-free oats and almond flour. Everything else stays the same.
- Reduced sugar: Cut brown sugar to 1/2 cup and keep maple at 1/4 cup. The spices will carry the flavor.
- Spice swap: Use 2 teaspoons pumpkin pie spice in place of the individual spices.
- Crunch topping: Sprinkle 2 tablespoons chopped pecans over the crust before filling for extra texture.
- Mini pies: Press crust into greased muffin tins, par-bake 7 minutes, fill, and bake 18–22 minutes.
FAQ
Can I use fresh pumpkin instead of canned?
Yes.
Roast cubed sugar pumpkin or kabocha until tender, then puree until very smooth. Drain excess liquid through a cheesecloth or fine sieve so the filling isn’t watery.
How do I know when the pie is done?
The edges will be set and the center will wobble slightly when you nudge the pan. An instant-read thermometer inserted 1 inch from the center should read about 175°F (80°C).
Why did my crust crumble?
It likely needed a touch more moisture or firmer pressing.
Next time, add water 1 teaspoon at a time until it holds together, and compact it firmly up the sides.
Can I make it ahead?
Absolutely. Bake the day before, cool, cover, and chill. The flavors deepen overnight, and slicing is easier.
What can I use instead of evaporated milk?
Half-and-half gives a richer result.
For dairy-free, use full-fat coconut milk. Avoid thin milks, which can make the filling loose.
Is this pie very sweet?
It’s moderately sweet, with warmth from brown sugar and maple. If you prefer a lighter touch, reduce the brown sugar to 1/2 cup.
Final Thoughts
This Oat Crust Pumpkin Pie brings together everything you want in a fall dessert: a creamy, spiced filling and a crust that tastes like toasted granola in the best way.
It’s unfussy, reliable, and easy to tweak for different diets. Make it once for a gathering, then keep it in your back pocket for cozy weekends and potlucks. Simple ingredients, big comfort, and a clean slice every time.
Printable Recipe Card
Want just the essential recipe details without scrolling through the article? Get our printable recipe card with just the ingredients and instructions.
Loved This Recipe?
If you're looking for more simple, healthy dinners your family will actually eat, grab my FREE 7-Day Easy Dinner Reset. You'll get 7 easy dinner recipes, simple grocery lists, and a done-for-you plan that takes the stress out of mealtime.